


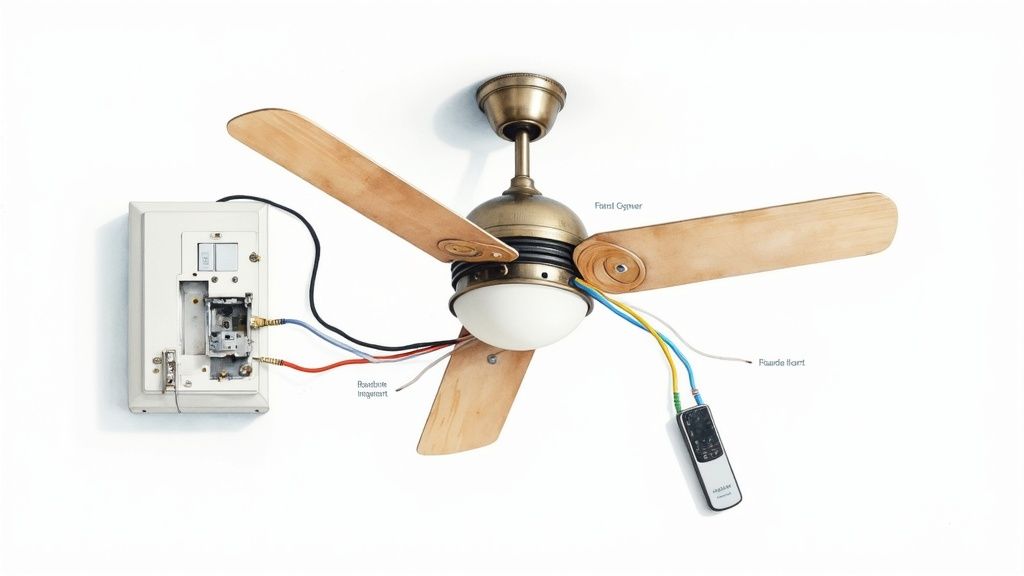
Ceiling Fan Remote Control Wiring Diagram Explained
A ceiling fan remote control wiring diagram can look like a jumble of lines and colors, but it's really just your road map to wireless bliss. Think of it as the visual blueprint showing you exactly how the new remote receiver connects to your fan and the existing wires in your ceiling. Getting this part right is the key to a successful—and seriously satisfying—installation.
Decoding Your Ceiling Fan Wiring Blueprint
Before you grab your wire strippers, let’s get acquainted with the cast of characters on that diagram. Each part has a specific job, and the diagram is your script, making sure everything works together flawlessly. It’s like assembling a superhero team, but for your living room comfort.
The star of the show is the remote receiver. This little black box is the brains of the operation, and it gets tucked neatly into the fan's canopy right at the ceiling. It catches the wireless signals from your remote and acts as the middleman, telling the fan motor and light exactly what to do.
The Key Players in Your Wiring Diagram
Your diagram is going to show connections between four main elements:
- Your Home's Power Source: These are the wires poking out of the electrical box in your ceiling. They're bringing the juice to the whole party.
- The Remote Receiver: This is the new piece you're adding. It has wires coming out of both sides—one set to connect to the house wiring and the other to connect to the fan itself.
- The Fan Motor: This is what gets the blades spinning. It needs its own power feed, which the new receiver will now control.
- The Light Kit: If your fan has lights, it will have a separate wire that also connects to the receiver, letting you control the lights independently from the fan.
This kind of upgrade is more popular than ever. The global market for ceiling fan remote kits has ballooned to USD 1.36 billion. That number tells a clear story: people want the convenience and smart home potential that a remote offers. You can dig into more insights about the ceiling fan remote market and see just how fast it's growing.
Understanding the Language of Wires
For a lot of people, the rainbow of wire colors is the most intimidating part. The good news is that residential wiring follows a pretty standard color code, which makes that diagram a lot less cryptic once you know the lingo.
Pro Tip: Before you disconnect a single wire, snap a quick photo of the existing setup with your phone. Trust me, this simple step can be an absolute lifesaver if you get turned around and need to remember how things looked originally.
To help you translate that diagram, here’s a quick-reference table for the common wire colors you'll be working with.
Common Wire Colors and Their Functions
This table breaks down what each color typically means in a ceiling fan installation.
| Wire Color | Common Name | Function in a Ceiling Fan Circuit |
|---|---|---|
| Black | Hot / Live | Delivers the main power from your home's circuit breaker to the receiver. |
| White | Neutral | Completes the electrical circuit, returning current to the power source. |
| Blue | Light Power | A dedicated hot wire from the receiver that specifically powers the light kit. |
| Red | Switched Hot | Often used in dual-switch setups, this is an alternate hot wire from the wall. |
| Green/Bare Copper | Ground | A safety wire that protects against electrical shock by providing a path for faults. |
Once you’re familiar with these parts and their wire colors, the ceiling fan remote control wiring diagram stops being a confusing schematic and becomes your step-by-step guide. With this foundation, you’ll have the confidence to tackle the hands-on work.
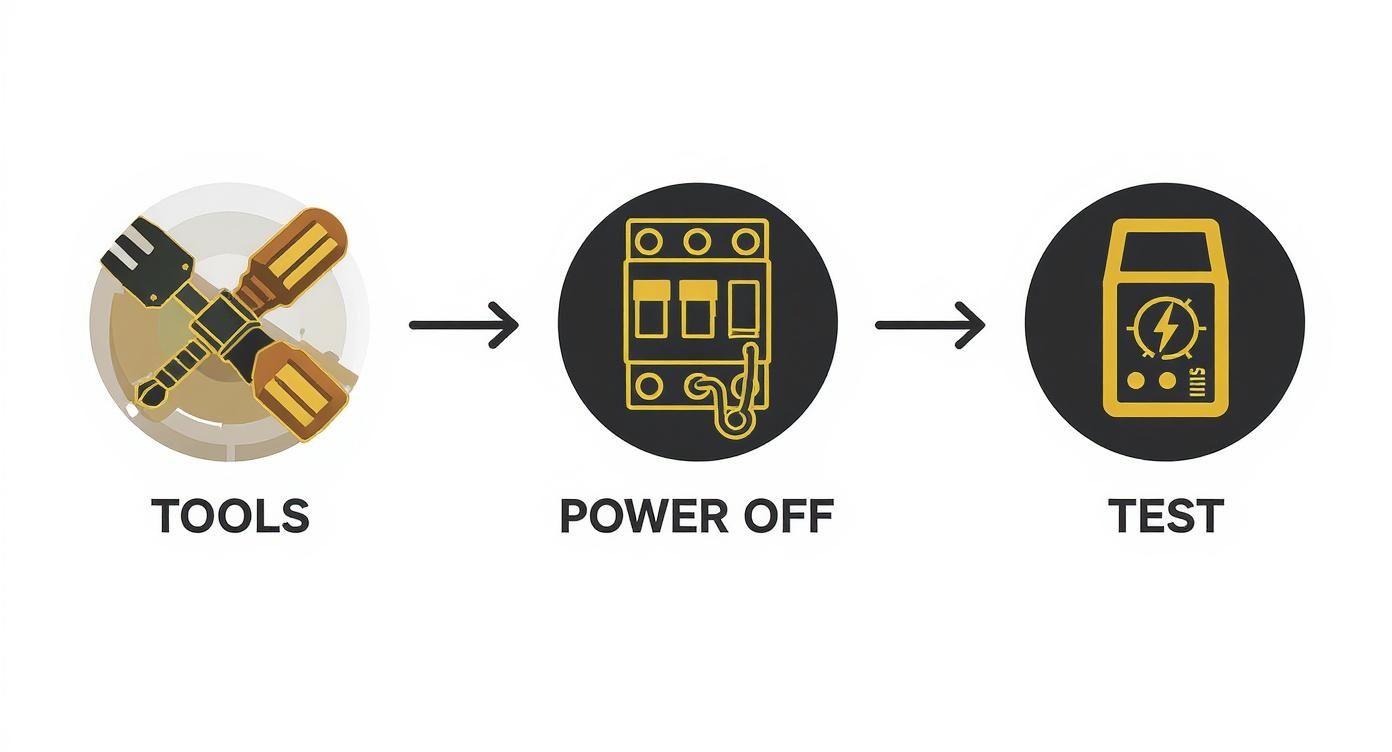
Gathering Your Tools and Prioritizing Safety
Before you even think about touching a wire, let’s talk prep work. A smooth DIY project is all about having the right gear on hand and a healthy respect for what you're working with. This isn't just about avoiding a few extra trips to the hardware store—it's about doing the job safely and with confidence.
Working with electricity demands your full attention. The key isn't to be scared of it, but to follow a simple, rock-solid safety process every single time. Honestly, the most important tool you'll use today isn't a screwdriver; it's the routine you follow before starting.
Your Essential Toolkit for the Job
You don't need a professional-level workshop, but a few key items will make this project much easier. Think of these as your go-to gear for getting this done right.
- A Non-Contact Voltage Tester: This is your #1 safety tool, period. It lets you confirm the power is off just by getting it near a wire—no touching required. Never, ever trust a wall switch alone.
- A Reliable Screwdriver Set: You'll want both Phillips and flathead screwdrivers for the fan canopy and various other screws.
- Wire Strippers and Cutters: A dedicated tool is so much better than a knife for this. It gives you a clean strip on the wire's insulation without accidentally nicking the copper, which is critical for a secure connection.
- Wire Nuts: Your remote kit probably comes with a few, but it's always smart to have some extras in different sizes just in case.
- A Sturdy Ladder or Step Stool: Make sure it's tall enough so you can work comfortably without stretching. Reaching overhead from a wobbly perch is a recipe for disaster.
Got these lined up? You’re in good shape. If you’re replacing the whole fan and not just adding a remote, our guide on how to install a ceiling fan covers the entire process from unboxing to the first spin.
The Unbreakable Rules of Electrical Safety
This is the most important part of the entire job. Don't skip a single step, and do them in this exact order every time. This is how you guarantee the circuit is completely dead before your hands go anywhere near the wiring.
- Find the Breaker and Kill the Power: Head over to your home's main electrical panel. Find the breaker that controls your ceiling fan and flip it all the way to the "OFF" position. If your panel isn't labeled (a common headache!), you might need a helper to stand in the room and tell you when the fan light goes out as you flip breakers.
- Double-Check at the Wall Switch: Go back to the wall switch that controls the fan and flip it to "ON". This sounds wrong, but trust me, it's a crucial part of the safety check.
- Test for Power—Twice: Now, grab that non-contact voltage tester. You’ll need to remove the fan’s canopy to get to the wiring in the ceiling box. Carefully bring the tip of your tester near every single wire. The tester should not light up or make a sound. This is your final, definitive proof that the power is off and you're safe to get to work.
This three-step process—breaker off, switch on, test the wires—is the gold standard for DIY electrical safety. It takes all the guesswork out of the equation and ensures you’re working on a totally de-energized circuit.
When you make safety your first priority, an intimidating project becomes a totally manageable—and satisfying—upgrade. It's the professional approach that guarantees your new remote control works perfectly and is installed safely.
Connecting the Receiver for Common Wiring Setups
Alright, you’ve studied the diagrams and you've got the plan. Now it’s time to get up on that ladder and bring your new remote control to life. This is where the rubber meets the road—or rather, where your wires meet the receiver. Don't sweat it. Most homes have one of a few standard wiring setups, and we'll walk through each one.
The goal here is pretty straightforward: you're installing a new "brain" for your fan. The receiver intercepts the power coming from the ceiling and acts as a sort of traffic cop, telling the electricity where to go based on the signals from your remote. Before, power went straight from the wall switch to the fan. Now, it makes a pit stop at the receiver first.
This is the core of the upgrade, turning a basic pull-chain fan into a modern convenience. It’s no surprise that remote controls have become a standard feature. The global ceiling fan market is a massive USD 11.39 billion industry, and a lot of that growth is driven by smart features like this that make our homes more comfortable and efficient. You can find more details on the ceiling fan market's growth and see just how big a role remote integration plays.
Before you touch a single wire, let's hammer home the safety essentials.
This isn't just a suggestion—it's the only way to do this job. Get your tools ready, kill the power at the breaker, and then double-check that the wires are dead with a voltage tester. Every single time.
The Single-Switch Setup
This is the classic setup you’ll find in most homes: one wall switch controls power to the whole fan fixture. Flip it on, and both the fan and light get juice. From there, you're yanking on pull chains. Our mission is to make those chains obsolete.
Here’s the game plan for the wiring:
- From the Ceiling: You should see a black (hot), white (neutral), and green or bare copper (ground) wire.
- Receiver Input: Your receiver has an "AC In" side. Connect the ceiling's black wire to the receiver's black "AC In L" wire. The ceiling's white wire goes to the receiver's white "AC In N" wire.
- Receiver Output: On the other side, you'll find "To Fan" wires. Connect the receiver's black wire (often marked "For Fan") to the fan motor's black wire. The receiver's blue wire ("For Light") connects to the fan's light kit wire, which is also usually blue.
- Neutrals and Grounds: Twist all the white neutral wires (from the ceiling, receiver, and fan) together under one wire nut. Do the same for all the ground wires.
That's it. The receiver is now sitting right in the middle of the circuit, ready to take orders once you flip the wall switch back on.
The Constant Power Setup
In some houses, especially older ones, the ceiling box might have power all the time, with no wall switch in sight. The fan is "always hot," and the pull chains are your only means of control. This situation is practically begging for a remote upgrade.
The wiring process is nearly identical to the single-switch setup. The crucial difference is that the black wire in the ceiling is live 24/7. This makes shutting off the breaker and using your voltage tester absolutely non-negotiable.
Once you've confirmed the power is off, the connections follow the same pattern: ceiling black to receiver input black, ceiling white to receiver input white, and then the receiver's output wires (black and blue) to the corresponding fan and light wires. After you're done, the remote will be the only control for your fan.
Important Takeaway: For any remote install, you have to leave the fan and light pull chains in the "on" position before you tuck the receiver into the canopy. Set the fan to its highest speed and turn the light on. The remote needs the fixture to be in this "ready state" to work properly.
The Dual-Switch Setup
A more premium setup is the dual-switch configuration, where two separate wall switches control the fan motor and the light kit independently. This means you have two hot wires coming from the ceiling—typically one black and one red.
A standard remote kit is designed to be powered by a single hot wire. So, you'll have to make a choice: which switch will be the master power source for the remote system?
Here's how you tackle it:
- Pick Your Master Switch: Decide which wall switch you want to power the remote receiver. Let's say you go with the one connected to the ceiling's black wire.
- Cap the Extra Wire: The other hot wire (the red one, in our example) is now redundant. You need to safely cap it off with a wire nut, making sure it's secure, and then tuck it back into the electrical box. It’s now a dead-end.
- Wire It Like a Single-Switch: From this point on, you follow the exact same steps as the single-switch installation. Connect your chosen hot wire (black) and the neutral (white) from the ceiling to the receiver's input side. Then, wire the receiver's output to the fan and light.
The second, now-unused wall switch can be disabled or covered with a blank plate to prevent confusion down the road. If you really want to maintain separate wall switch control, you'll need a specialized wall control unit, not just a simple remote. To learn more about your options, check out our guide on choosing the right switch for your ceiling fan.
Elevate Your Space with a Premium Smart Fan
https://www.youtube.com/embed/8JshWc-_Al8
Once you’ve tackled a standard ceiling fan remote control wiring diagram, you start to see the bigger picture. You’re not just adding a remote anymore; you’re unlocking a whole new level of home comfort and automation. This is exactly where high-end smart fans come in, turning a simple appliance into a true centerpiece of modern living.
Instead of just slapping a universal remote receiver into an old fan, imagine a fan designed from the ground up to integrate with your smart home. This isn't some futuristic fantasy—it's the new standard for premium air movement.
Beyond the Basic Remote: A Leap into Smart Technology
So, what does this next level of convenience actually look like? Let's take a premium model like the Fanimation 'Haiku' Smart Ceiling Fan. With a price tag that can sail past $1,500, this isn't just a fan; it's a sophisticated piece of home technology. It’s a serious upgrade in both style and function, leaving a basic universal remote kit in the dust.
What really sets a fan like this apart?
- Whisper-Quiet DC Motor: These advanced DC motors aren't just unbelievably quiet. They're also up to 70% more energy-efficient than the old AC motors you’re used to. That means lower electricity bills and a much more peaceful room.
- Full App Control: Forget that clunky plastic remote. These fans are managed through a dedicated smartphone app, giving you total control over scheduling, variable speeds, and seasonal modes from absolutely anywhere.
- Smart Home Integration: This is the real game-changer. The 'Haiku' connects seamlessly with ecosystems like Amazon Alexa, Google Assistant, and Samsung SmartThings. You can control your fan with a simple voice command: "Hey Google, set the bedroom fan to 50 percent."
The wiring for these smart fans builds on the same principles you've already learned. You’ll still connect the hot, neutral, and ground wires from your ceiling box to the fan's built-in receiver. The difference is that this receiver is a much more advanced piece of hardware, packed with a Wi-Fi module that talks directly to your home network.
The Real-World Benefits of Investing in a Smart Fan
Stepping up to a premium smart fan is about more than just having a cool new gadget. It’s an investment in your home’s comfort, efficiency, and overall value. The convenience alone is a huge win. Think about creating a "Bedtime" routine in your smart home app that dims the lights, lowers the thermostat, and sets your fan to a gentle, cooling breeze—all with a single tap or voice command.
On top of that, the energy savings can be pretty substantial over the fan's lifetime. The ability to precisely schedule when your fan runs means you’re not wasting electricity cooling an empty room. You can program it to turn on an hour before you get home or shut off automatically after you've left for the day.
A study on home automation found that smart climate control, including devices like smart fans, can reduce energy consumption for heating and cooling by as much as 15%. That's a tangible return on your investment that you'll see on your utility bills.
Is a Premium Smart Fan the Right Choice for You?
While a universal remote kit is a fantastic, budget-friendly way to upgrade an old pull-chain fan, a premium smart fan is all about future-proofing your home. The installation process is fundamentally the same, but the result is worlds apart. You go from simply controlling your fan remotely to fully integrating it into an automated smart home.
If your current fan is getting old, noisy, or just plain inefficient, upgrading to a complete smart fan package will give you a much bigger return in comfort and style.
If you’re just looking to add some modern convenience to a fan you already love, you can explore plenty of great options for a universal remote for your fan to get that immediate boost. But if you're planning a room renovation or building a new home, stepping up to a fully integrated smart fan like the Fanimation 'Haiku' is a decision that adds lasting value, elegance, and intelligent comfort to your space.
Troubleshooting Common Installation Hiccups
You’ve done it. You wrestled with the wires, followed the ceiling fan remote control wiring diagram to the letter, and tucked the receiver neatly into the canopy. You flip the breaker back on, grab the remote with a sense of triumph, and… nothing. Or maybe just the light works, but not the fan.
Don't panic! Even the most seasoned DIYer hits a snag now and then. This is your personal help desk for solving those post-installation puzzles.

Most of these issues are surprisingly simple to fix. It's usually a matter of backtracking logically, starting with the easiest solutions before you even think about undoing all your hard work. Think of it as detective work—we're just looking for clues.
The Remote Is Completely Unresponsive
This is the most common—and often the easiest—problem to solve. You press a button, and the fan gives you the silent treatment. Before you get frustrated, run through this quick diagnostic checklist.
- Check the Obvious First: Are the batteries installed correctly? Did you remember to pull the little plastic tab out of the battery compartment? It sounds silly, but from my experience, 90% of "dead remote" issues are battery-related. When in doubt, swap in a fresh set just to be absolutely sure.
- Verify the Power Cycle: The receiver needs a little "reboot" to listen for the remote's signal. Head to your wall switch or circuit breaker and kill the power. Leave it off for at least 10-30 seconds, then turn it back on. You usually have a short window—about three minutes—to press the 'pair' button on the remote after restoring power.
- Review the Dip Switches: If your remote and receiver have those tiny physical switches (dip switches), they must match perfectly. A single switch in the wrong position will break the connection. Pop the remote's battery cover off and climb back up to check the receiver—make sure the patterns are identical.
If you’ve tried all of these steps and still have no response, it’s time to look at the wiring. But more often than not, one of these three things will bring your fan to life.
The Fan Works but the Light Does Not (or Vice Versa)
Here's a classic sign of a specific wire mix-up. If one part works and the other doesn't, it means the receiver is getting power, but the signal isn't making it all the way to the faulty component.
Troubleshooting Insight: This almost always points to the "output" side of your receiver. Specifically, the connection between the receiver's blue "For Light" wire and the fan's light kit wire is the prime suspect.
Your mission is to re-examine those connections. After killing the power at the breaker (and testing to make sure the wires are dead), gently pull the receiver out. Check that the wire nut connecting the blue wire from the receiver to the blue (or sometimes black with a white stripe) wire from the fan's light kit is secure. A loose connection here is the most frequent culprit.
A Persistent Humming Noise
An annoying hum can completely ruin the peaceful ambiance a ceiling fan is supposed to create. While a little bit of motor noise is normal, a loud or new hum after installing a remote often points to a compatibility or wiring issue.
Common Causes of Fan Humming:
- Incompatible Dimmer: Universal remote receivers rarely play nice with dimmer wall switches. The remote is designed to get a steady, full-power signal. If you have a dimmer switch on the wall, you’ll need to replace it with a standard on/off toggle switch.
- Loose Wires: That buzzing sound can literally be caused by wires vibrating against the fan canopy or each other. When you re-check your connections, make sure all wire nuts are twisted on tight and try to arrange the wires so they aren't pressed firmly against the metal housing.
- Receiver Placement: Make sure the receiver isn't being squished inside the canopy. If it's wedged in at an odd angle or is in direct contact with the fan's mounting bracket, the vibration can cause a hum. A little repositioning can work wonders.
Solving these hiccups is just a process of elimination. By starting with the simplest fixes and methodically checking each potential issue, you can diagnose the problem and get your fan running smoothly and silently.
Got a Few More Questions About Your Fan Wiring?
Even with the best ceiling fan remote control wiring diagram in hand, it's totally normal for a few questions to pop up. Think of this as the final check-in, where we tackle those common head-scratchers that come up during an installation.
You’ve got this. You have the tools, you've done the safety checks, and you’re about to wrap up this project. Let’s clear up those last few "what-ifs" so you can get that fan spinning with confidence.
Can I Add a Remote Control to Any Ceiling Fan?
Pretty much any standard pull-chain ceiling fan is fair game for a universal remote kit. The biggest hurdle you’ll run into isn’t the wiring—it’s the physical space. You absolutely need enough room inside the fan's canopy (that decorative cup that sits against the ceiling) to tuck the new receiver unit away.
Most fans made in the last decade or so are designed with this kind of upgrade in mind. However, some older fans or the super-compact "hugger" style models might be a tight squeeze. It’s always a good idea to measure the inside of your canopy before you buy a remote kit.
One major exception: if your fan already has a built-in remote or a proprietary wall control system, a universal add-on kit usually won't work. Those systems are designed to talk only to each other.
My Remote Is Controlling the Neighbor's Fan—What Do I Do?
Believe it or not, this happens all the time, especially in apartments or homes built close together. It’s a classic case of your remote and receiver being on the same frequency as your neighbor's. Luckily, the fix is refreshingly simple: you just need to change the dip switches.
If you pop open the battery compartment on your remote and look at the side of the receiver unit, you'll see a small block of tiny physical switches. These are the dip switches, and their on/off pattern creates a unique code. All you have to do is create a new, random pattern on both your remote and your receiver.
Key Takeaway: The dip switch pattern on the remote must be an exact match to the pattern on the receiver. This creates your own private little communication channel, making sure your remote only bosses your fan around.
Do I Have to Turn Off the Wall Switch After Using the Remote?
Nope—and you should actually do the exact opposite. Once the remote is installed, the wall switch needs to stay in the "ON" position permanently.
Think of that wall switch as the main power source for the remote's receiver. If you flip it off, you cut the power to the receiver, and your remote control is suddenly useless.
From now on, the remote is your new on/off switch. Before you button everything up, just make sure you set the fan's pull chains to the right positions so the remote has full control.
- Fan Speed Pull Chain: Pull it until the fan is on its highest speed.
- Light Kit Pull Chain: Pull it so the light is "ON".
By leaving the fan in this "ready" state, you’re handing over all the control to the remote receiver. The wall switch just becomes a master power cutoff for maintenance, while the remote does all the day-to-day work.
Ready to move beyond a simple remote and into a fully integrated smart home experience? Fan Connection offers a curated collection of premium smart fans that blend stunning design with the latest tech. Explore models from top brands that feature voice control and app integration, and truly elevate your space. Find your perfect fan at https://www.fanandlights.com.


