


Your Ultimate Guide to Ceiling Fan Capacitor Replacement
Ever wonder what makes your ceiling fan spring to life with the flip of a switch? It’s not magic, but it’s close! Deep inside, a small but mighty component called the ceiling fan capacitor is doing all the heavy lifting. Think of it as your fan's personal hype man, a tiny energy drink in a box designed for one specific job: giving the motor the explosive kickstart it needs to get the party started.
The Unsung Hero Inside Your Ceiling Fan

We've all been there. You flip the switch, and those heavy blades start spinning effortlessly, creating a blissful breeze. The real credit for that smooth takeoff goes to the capacitor. This little powerhouse is the unsung hero of your fan, handling two critical jobs: getting the motor started and then telling it how fast to go.
Imagine a runner coiled at the starting line. When the gun fires, they explode forward with a massive burst of energy. The capacitor does the exact same thing for your fan's motor. It stores up a little charge and then unleashes it in a powerful jolt to overcome inertia and get the blades moving from a dead stop. Without that initial push, the motor would just sit there and hum a sad, motionless tune.
More Than Just a Starter
But the capacitor's work isn't done after that first second. Once the blades are spinning, it shifts into its second role as a speed regulator. It precisely manages the flow of electricity to different parts of the motor, acting like a cruise control system for your fan.
When you pull the chain or press a button for low, medium, or high, you're actually telling the capacitor which circuit to use. It adjusts the electrical current, and in turn, the motor knows exactly how fast to spin. This dual-function design is what makes multi-speed fans possible.
Because the capacitor is so central to your fan’s performance, a failing one is often the culprit behind common fan problems. Understanding what it does is the first step to figuring out why your fan is acting up—a fix that's a whole lot easier than replacing the entire unit. The capacitor is housed with the other wiring, a core part of the fan's assembly which you can see in our guide on how to install a ceiling fan.
Key Takeaway: The capacitor acts as both a "starting gun" to get the fan moving and a "speed controller" to maintain different velocities. It's a single part with two distinct, vital functions.
To put it simply, here’s a quick breakdown of what this little component is doing behind the scenes.
Capacitor Function at a Glance
| Capacitor Role | Primary Function | Simple Analogy |
|---|---|---|
| Start Capacitor | Provides a strong initial electrical jolt to overcome motor inertia. | The powerful first push you give a merry-go-round to get it moving. |
| Run Capacitor | Regulates current to the motor windings to control different fan speeds. | The gear shifter on a bicycle, changing how much power goes to the wheels. |
This table shows how a single component can wear two very different hats to keep your fan running smoothly.
The Role in Modern Fan Technology
Just how important is this little part? The global market for ceiling fan capacitors was valued at USD 1.5 billion and is expected to climb to USD 2.8 billion by 2033. That growth says a lot about how essential these components are for the energy-efficient, reliable operation of the fans we depend on every day.
Ultimately, this small electronic part is the key to a quiet, efficient, and dependable ceiling fan. By knowing its role, you can better appreciate the engineering humming away above your head and feel more confident when it's time to troubleshoot a problem. It’s the small part that makes a huge difference in your home's comfort.
Telltale Signs Your Fan Capacitor Is Failing
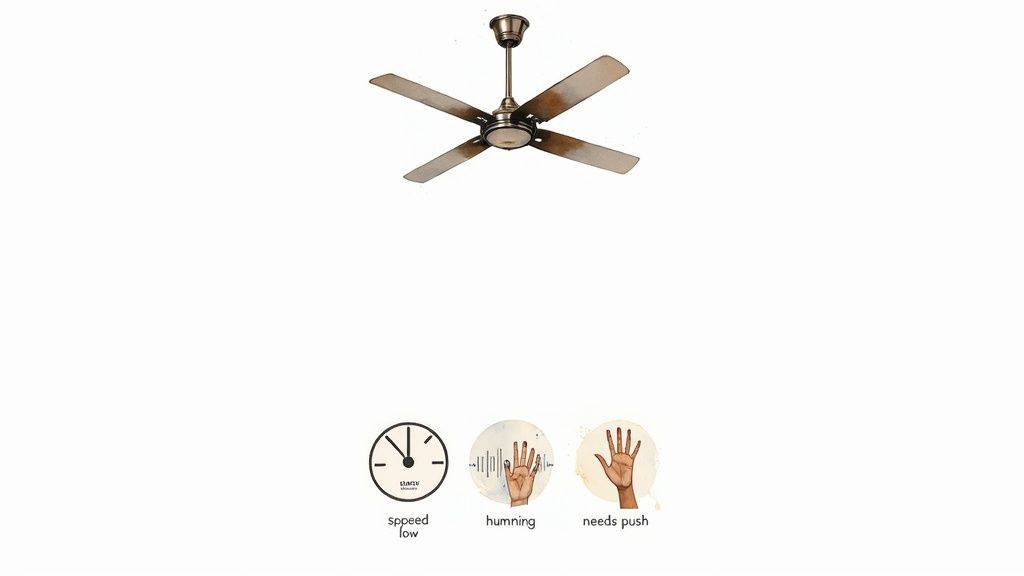
Is your trusty ceiling fan suddenly acting up? Before you start shopping for a whole new fan, hold on. The real problem is often a tiny, inexpensive part called the ceiling fan capacitor. It’s the true workhorse behind the scenes, and when it starts to fail, it sends out some classic distress signals.
Learning to spot these symptoms is your ticket to a quick, easy, and affordable fix. A dying capacitor can't give the fan motor the electrical kick it needs to get going and run smoothly. This electrical fatigue shows up in ways that are pretty obvious once you know what to look for.
The Fan Needs a Manual Push to Start
This is the big one—the most definitive sign of a bad start capacitor. You flip the switch, hear the motor hum, but the blades just sit there like they're on strike. If you give the blades a gentle push and they slowly creak to life, you've almost certainly found your culprit.
Think of the capacitor as providing the initial jolt of energy to get things moving. When it gets weak, it no longer has the oomph to overcome the fan's inertia. That little push you're giving it is literally doing the capacitor's job for it.
Your Fan Is Stuck on One Speed
Does your fan blast on high no matter which speed you select? Or maybe it’s stuck on the lowest setting and refuses to speed up? This is a textbook symptom of a failing multi-wire run capacitor.
These capacitors have separate circuits for each speed. When one of those internal pathways gives out, you lose that speed setting.
- Stuck on High: The circuits for low and medium have probably failed, leaving only the high-speed setting, which often bypasses the capacitor.
- Stuck on Low: The capacitor isn't delivering the extra juice needed to kick the motor into its higher-speed modes.
This issue points directly to a worn-out capacitor that can't regulate the motor's power anymore. It’s a clear signal that the component in charge of speed control is on its last legs.
A Loud Humming Noise from the Motor
A gentle, quiet hum is normal for a fan, but a loud, strained humming—especially when the blades won't turn—is a major red flag. That sound is the motor getting power from the wall but not getting the right electrical nudge from the capacitor to start spinning.
The motor is basically "stuck," trying to move but not getting the right instructions. This can cause it to overheat, turning a simple capacitor problem into a much more serious motor failure if you ignore it.
Upgrading Can Be the Ultimate Fix
Replacing a capacitor is a fantastic, budget-friendly repair, but sometimes it’s a sign that your fan has put in its years. If your fan is on the older side or you're just ready for a serious boost in performance and style, this could be the perfect excuse to explore a new, premium model.
Consider the Artiste 52 Inch 3 Blade Smart Ceiling Fan, a beautiful piece of modern design that does way more than just move air. Priced at $349.99, it comes with a whisper-quiet DC motor, full smart home integration, and a look that can completely redefine a room. Investing in a high-quality fan like this not only solves your current problem but also brings better energy efficiency and a touch of luxury into your home. It’s a long-term solution that elevates both comfort and style.
How to Read a Capacitor and Find the Right Replacement
Choosing a new ceiling fan capacitor can feel a little like trying to crack a secret code. You’re looking at a small plastic box covered in numbers and symbols, and getting the fan spinning again hinges on picking the right one. The good news? It’s far simpler than it looks. We're about to give you the decoder ring.
Think of the numbers printed on your old capacitor as its technical resume. It tells you everything you need to know about its job. By understanding just two key specs, you can confidently find the perfect match and get your fan back to work.
The Most Important Number: Microfarads (µF)
First things first, you need to find the microfarad rating. It will be labeled with the symbol µF (or sometimes MFD or uF). This is the single most critical number, and you absolutely must match it exactly.
The microfarad value is all about the capacitor's storage capacity—think of it like the size of a water bucket that gets dumped to give the motor a push. The fan's motor is designed to work with a very specific µF value to run correctly at different speeds.
Getting this number wrong will cause serious problems:
- Too Low: If the µF value is too small, the motor won't get a strong enough "push" to get going. Your fan will struggle to start, run sluggishly, or just refuse to reach its proper speeds.
- Too High: A µF value that's too high is even worse. It will overwhelm the motor windings with too much electricity, causing the fan to run hot, make a loud humming noise, and can quickly burn out the motor for good.
The Safety Net: Voltage Rating (VAC)
The next number you'll spot is the voltage rating, usually followed by VAC (for Volts Alternating Current). This isn't about performance; it's a safety limit representing the maximum voltage the capacitor can handle before it fails.
Here’s the golden rule: you can go up in voltage, but you can never go down.
If your old capacitor says 250VAC, a replacement rated for 370VAC or 450VAC is perfectly fine—in fact, it's a bit more robust. But putting a 180VAC capacitor in a system that calls for 250VAC is asking for trouble. It will fail, likely very quickly.
Pro Tip: Always match the µF rating exactly. For the voltage (VAC) rating, you can choose a replacement that is equal to or higher than the original for an extra margin of safety.
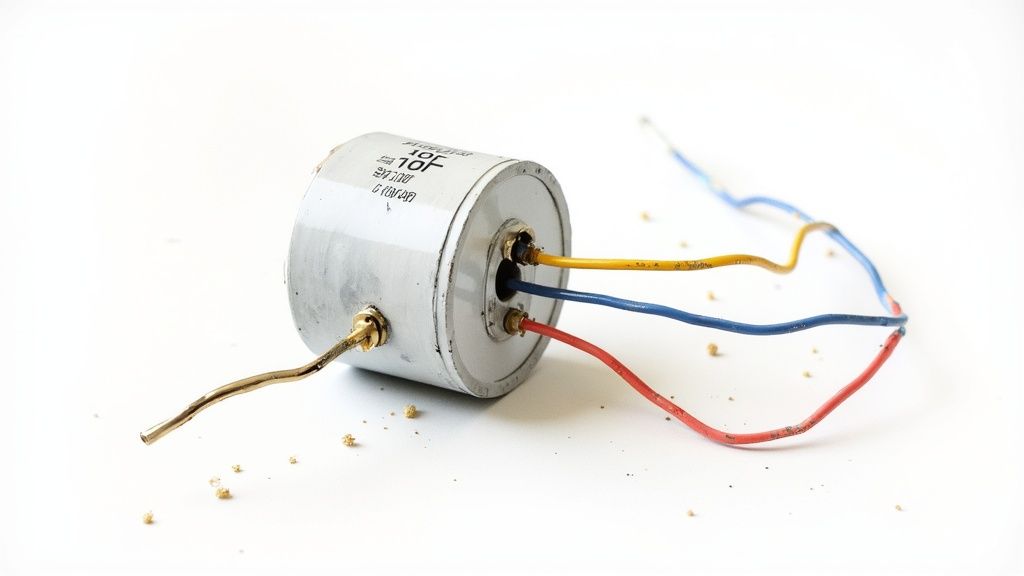
Decoding Capacitors With Multiple Wires
Many ceiling fans use a single capacitor unit with three, four, or even five wires coming out of it. This isn't just one big capacitor; it's actually two or three separate capacitors housed together in one tidy block. Each one provides a different µF value for the fan's different speed settings.
The label will list multiple µF values, something like "4µF + 5µF + 6µF." The trick is figuring out which wire goes with which value. Luckily, most capacitors have a diagram or legend printed right on them, indicating which color wire (e.g., Purple, Brown, Gray) corresponds to each microfarad rating.
Don't ever assume the wire colors on a new capacitor will match the old one—there is no universal standard. For professionals managing lots of parts, tools like inventory management software are a huge help in preventing stock-outs of common components. For a DIYer, your best bet is always to snap a clear photo of the original wiring before you disconnect anything.
Once you know how to read the label, finding the right part is easy. Just focus on getting an exact µF match and an equal-or-greater voltage rating, and you’ll be ready to order your replacement with confidence.
Safely Testing Your Suspect Capacitor
Alright, so all signs are pointing to a bad ceiling fan capacitor. Now it's time to confirm it once and for all. This last step is pretty simple, but it demands your full attention to safety. Messing with electricity is no joke, so we’ll walk through this the right way, with safety as our top priority.
Before you even dream of touching a single wire, your number one job is to kill the power. Don't skip this.
-
Cut the Power: Head over to your circuit breaker panel and find the breaker for your ceiling fan. Flip that switch to the OFF position. If your breakers aren't labeled, you might have to turn the fan on, then start flipping breakers until it dies.
-
Confirm with a Tester: Now, grab a non-contact voltage tester—a must-have tool for any electrical work. Hold the tip near the fan's pull chain or wall switch. If it stays quiet and dark, the power is officially off. This double-check is non-negotiable.
The Initial Visual Inspection
With the power confirmed off, you can get into the switch housing (that’s the part where the pull chains hang from). Carefully take off the cover to find the small, black, boxy capacitor. Sometimes, a quick look is all you need.
Keep an eye out for these dead giveaways of a fried capacitor:
- Bulging or Swelling: The plastic case should be perfectly flat. If it looks puffed up or has a rounded top, it’s failed internally.
- Cracks or Splits: Check the casing for any obvious cracks. That's a clear sign of damage.
- Leaking Fluid: See any oily or waxy gunk on the outside? That means the capacitor has burst.
If you spot any of these, congratulations—you've found the problem. You can stop here. The capacitor is toast and needs to be replaced.
Using a Multimeter for a Definitive Test
What if the capacitor looks perfectly normal? You'll need a multimeter to be sure. This tool measures the actual capacitance in microfarads (µF), telling you if it’s still performing within its intended range.
First things first: safely discharge the capacitor. Even with the power off, a capacitor can store a nasty electrical charge. To discharge it, just take an insulated screwdriver and carefully touch the metal tips across its two metal terminals for a few seconds.
Next, get your multimeter ready:
- Turn the dial to the capacitance setting. It’s usually marked with a µF symbol.
- Disconnect the capacitor's wires from the fan. Make sure you snap a clear photo of the wiring before you disconnect anything!
- Touch the multimeter probes to the corresponding input wires on the capacitor (like the common wire and one of the speed wires).
Your multimeter will give you a reading in microfarads. Compare that number to the µF value printed right on the capacitor's label. A good capacitor will read within +/- 6% of its rating. If your reading is way off, the capacitor is on its way out and needs replacing.
When you're digging into diagnostics, having the right tools makes all the difference. It's worth learning about choosing the right Fluke clamp tester if you plan on doing more electrical work.
It also helps to understand how everything connects inside your fan. For more complex setups, a good ceiling fan wiring diagram with remote control can show you exactly how the capacitor fits into the bigger picture. This kind of hands-on testing takes all the guesswork out of the equation, giving you a clear answer so you can fix your fan with confidence.
Repair or Upgrade? Deciding Your Next Move
Alright, you've done the detective work and the verdict is in: the capacitor is the problem. Nicely done! You’ve pinpointed the issue and now you have a choice to make. One path leads to a quick, easy, and impressively cheap fix. The other opens the door to a whole new world of modern style, quiet performance, and energy savings.
Let’s break it down.
For most people, this is an easy call. A new ceiling fan capacitor costs next to nothing—we’re talking less than a large pizza—and can breathe years of new life into your fan. It’s a smart, practical choice that gets your fan back in action without any fuss. But before you click "buy," it's worth taking a moment to think about the bigger picture.
If your fan is only a few years old and you still love how it looks, then repairing it is a no-brainer. But what if that fan has been faithfully spinning for a decade? Or maybe it’s started making a few other weird noises, or its style just feels a bit… dated. In that case, this little capacitor failure might just be the perfect excuse you've been waiting for to treat yourself to an upgrade.
The Simple Fix: Finding the Right Replacement
If you're sticking with a repair, your only mission is to find the right replacement part. As we’ve covered, that means matching the microfarad (µF) rating exactly and grabbing a capacitor with a voltage (VAC) rating that’s the same as or higher than your old one. But there’s one more detail to check: the physical size.
You need to be sure the new capacitor will actually fit back into the fan's switch housing. Take a quick measurement of the old part's height, width, and depth before you start shopping. Most are standard sizes, but it never hurts to double-check. Once you have the specs, you'll find plenty of options with a quick search online.
To make sure you're on the right track, this workflow is the key.
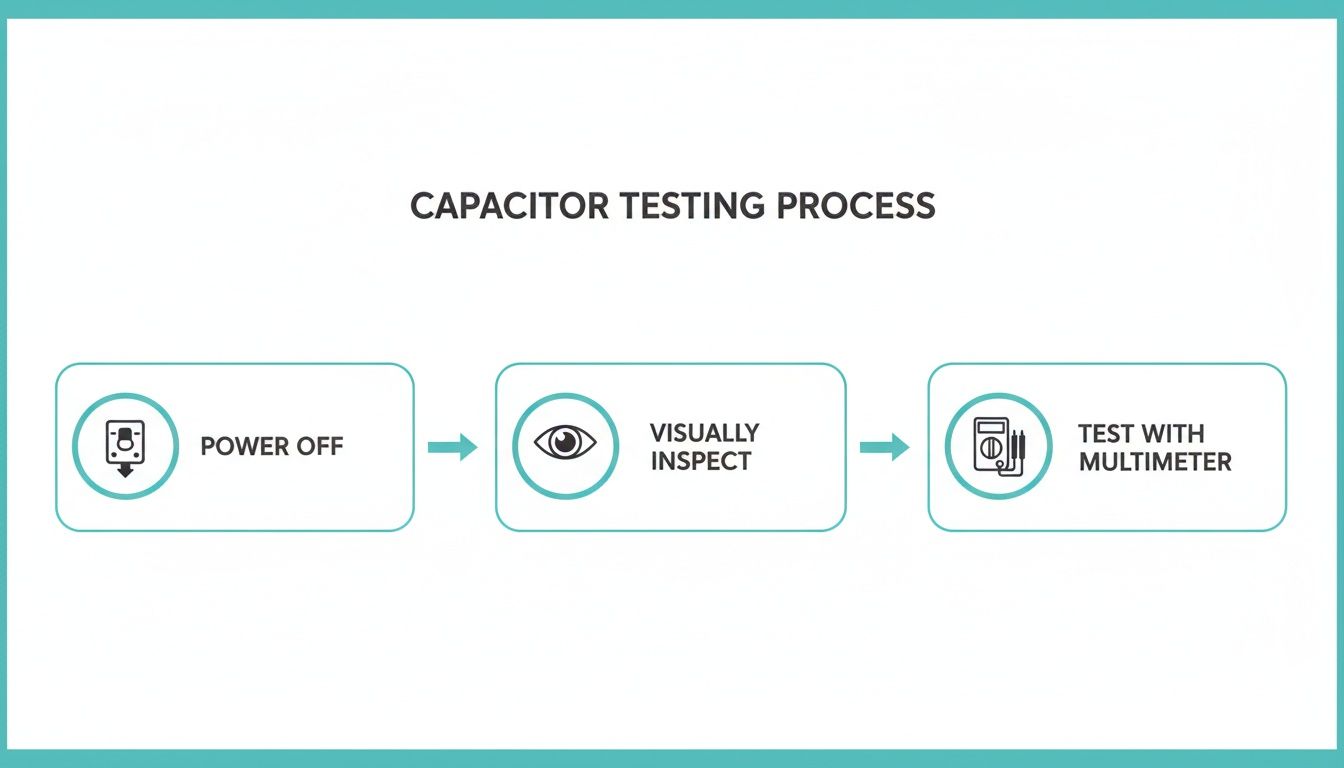
Following these steps—power off, visual inspection, then a multimeter test—takes all the guesswork out of the equation. It's the foundation for a safe and successful DIY fix.
The Upgrade Path: Investing in Modern Comfort
Now for the fun option. A ceiling fan isn't just a motor with blades; it’s a design element that sets the tone for an entire room. Investing in a premium model (think $300+) isn’t just about replacing a broken appliance—it’s about elevating your home's comfort and style.
Modern high-end fans bring some serious benefits to the table that older models just can't touch:
- Whisper-Quiet DC Motors: These next-gen motors are incredibly efficient—up to 70% more than old-school AC motors. They run so quietly you'll forget they're even on, which is perfect for bedrooms.
- Smart Home Convenience: Imagine telling Alexa to turn on the fan or setting a schedule from your phone. Smart fans offer a level of control that feels like living in the future.
- Seriously Good-Looking Designs: Today's fans are basically functional art. Whether you love sleek, minimalist looks or bold, architectural statements, there’s a fan out there that will become the centerpiece of your room.
Take the Chisel 52 Inch 3 Blade Ceiling Fan, for example. At $339.99, it's more than just a fan; it’s a statement piece. Its powerful DC motor moves a massive amount of air without a whisper, showing the huge leap in quality you get with a modern upgrade.
Choosing a premium fan is an investment in your home's comfort and long-term energy savings. To learn more about the financial and green benefits, check out our guide on energy-efficient ceiling fans. Whether you go for the quick fix or the full upgrade, you now know everything you need to make the right choice.
Your Ceiling Fan Capacitor Questions Answered
Alright, you're in the middle of the project, you've got your tools out, and now a few questions are probably buzzing around your head. That’s totally normal. Replacing a ceiling fan capacitor is a pretty simple job, but since it involves electricity, it’s always smart to double-check the details before you wrap things up. This section is here to clear up the most common questions and give you the confidence to get your fan spinning like new again.
Let's dive into what people usually ask when they're swapping out a capacitor.
Can I Use a Capacitor with a Higher Voltage Rating?
Yes, you absolutely can. In fact, using a capacitor with a higher voltage (VAC) rating is a safe and often recommended move. Think of the voltage rating as its maximum pressure limit—a higher number just means it's built tougher and can handle more electrical stress.
If your old capacitor was rated for 250VAC, popping in a 370VAC or 450VAC replacement is perfectly fine. It might even last longer. The one golden rule is to never use a lower voltage rating. If you put a 250VAC capacitor where a 370VAC is needed, it’s going to fail fast and could even damage other parts of your fan. Just focus on matching the microfarad (µF) rating, because that's what actually controls the motor.
What Happens If I Use the Wrong Microfarad Value?
Using the wrong microfarad (µF) rating is asking for trouble. That value is specifically tuned to your fan motor's needs to make sure it starts up and runs at the correct speeds. It's not a number you can just get "close enough" with.
- A µF value that's too low will essentially starve the motor. The fan will struggle to get going, run sluggishly, and probably won't be able to hit its higher speeds.
- A µF value that's too high is even worse. It shoves too much electricity into the motor windings, causing it to overheat, make a loud humming noise, and eventually burn out completely.
For the health and longevity of your fan, you have to match the original µF ratings as perfectly as you can.
The Bottom Line: The µF rating controls performance, while the VAC rating is all about safety. Match the µF exactly, and feel free to go equal or higher on the VAC.
Why Do the Wire Colors on My New Capacitor Not Match?
This is a classic curveball that catches a lot of people off guard. Capacitor wire colors are not standardized in the industry, so you can't trust them to be a guide. One brand might use red and yellow, while another uses purple and brown for the exact same connections. It's a common mistake to assume the colors will match up, and it can lead to some frustrating wiring problems.
The only thing you can rely on is the wiring diagram or legend printed right on the side of the capacitor itself. It will clearly show you which color wire corresponds to which µF value. Before you snip any wires on the old part, take a clear, well-lit photo of the setup. That picture will be your best friend when it's time to connect the new part based on its µF values, not its colors.
Is It Better to Replace the Capacitor or Just Buy a New Fan?
For most fans, replacing the capacitor is an incredibly smart, money-saving repair. The part usually costs less than $20, and it can save you hundreds compared to buying and installing a whole new fan. It's a quick fix that can easily add years back to your fan's life.
But, let's be honest—if your fan is already old, noisy, wobbly, or just looks dated, this might be the perfect excuse for an upgrade. Investing in a new, high-quality fan over $300 often brings benefits that a simple repair can't touch. These models offer better long-term value, comfort, and a serious style boost.
Think about what a modern fan brings to the table:
- Energy Efficiency: New fans with DC motors can use up to 70% less energy, which is great for your electricity bill.
- Quiet Operation: They're engineered to be whisper-quiet, making them perfect for bedrooms.
- Modern Features: Many come with remote controls, smart home integration, and sleek, built-in LED lighting.
A bad capacitor could be the nudge you need to invest in a fan that truly elevates your space for years to come.
At Fan Connection, we believe the right ceiling fan can completely transform a room. Whether you need a simple part or you're ready to explore a stunning upgrade like the modern Chisel 52 Inch 3 Blade Ceiling Fan priced at $339.99, we have a curated collection to fit your style. Discover the perfect blend of form and function at https://www.fanandlights.com.


