


How to Install a Ceiling Fan: A Fun DIY Guide
Installing a new ceiling fan is one of those DIY projects that totally transforms a room. You’re not just adding a breeze; you’re making a serious upgrade to your comfort and style. It's an awesome weekend project that most people can totally nail. The process is pretty straightforward: you’ll pick the right electrical box, measure for the perfect fan height, put the fan together on the ground (the easy way!), and then wire it all up.
Just remember the golden rule: always turn off the power at the circuit breaker before you start. Safety first, so you can enjoy your new fan without any shocking surprises!
Your Pre-Installation Game Plan

Before you even dream of grabbing a screwdriver, a little bit of planning will save you a world of frustration. This is the part where you make the smart choices that lead to a smooth installation and a fan you absolutely love. Skipping this step is a classic rookie mistake, and it’s often why people end up with a wobbly fan or a fixture that just looks... off.
First things first, and this is non-negotiable: you have to confirm your ceiling's electrical box is fan-rated. A standard box made for a simple light fixture can’t handle the weight and constant motion of a ceiling fan. Look for a stamp on the box that says "Acceptable for Fan Support." If you can't find it, or if you have a plastic box, you absolutely must replace it with a metal, fan-rated box and brace.
This isn't just a friendly tip—it's the most critical safety check you'll do. An improperly mounted fan is a serious hazard, and getting this right gives your installation a rock-solid foundation.
Choosing the Right Size and Style
Once you know the support is solid, it's time to pick a fan that actually fits the room. Getting the size wrong doesn't just look awkward; it's also incredibly inefficient. A fan that’s too small won't move enough air to make a difference, while one that’s too big can feel like you're in a wind tunnel.
To help you get it right, here’s a quick guide to match your fan to your room.
Quick Guide Ceiling Fan Size vs Room Size
A quick reference to help you choose the right fan blade span for your room to ensure efficient air circulation.
| Room Size (Sq. Ft.) | Recommended Fan Diameter (Inches) | Example Room Type |
|---|---|---|
| Up to 75 | 29-36 | Bathroom, Home Office, Walk-in Closet |
| 75-175 | 42-48 | Bedroom, Kitchen, Dining Room |
| 175-350 | 52-56 | Living Room, Master Bedroom, Great Room |
| Over 350 | 60+ | Open-Concept Living Area, Large Lofts |
Getting the size right means you'll get the airflow you need without wasting energy.
Speaking of energy, choosing an Energy Star-rated ceiling fan can cut electricity use by up to 40% compared to older models. Installing it correctly—so the blades are between 7 to 9 feet from the floor—is key to getting those savings.
Measuring for the Perfect Height
The height of your ceiling is the deciding factor in how your fan gets mounted. Grab a tape measure and find the distance from the floor to the ceiling. This number tells you if you need a downrod or if you can go with a flush mount.
For standard 8-foot ceilings, a flush mount (sometimes called a "hugger") is usually the way to go. It keeps the fan high enough to give you safe clearance.
If your ceilings are higher than 8 feet, you’ll need a downrod to lower the fan to that sweet spot for air circulation. The length of the downrod matters. For a 9-foot ceiling, a 6-inch downrod is pretty standard, but if you have vaulted ceilings, you might need a much longer one. If you're not sure, you can learn more about how to select the right downrod for your fan in our guide.
This is also your chance to pick a fan that's more than just functional—think of it as a centerpiece. Instead of a basic model, you could go for something with real style, like the sleek Minka-Aire F844-DK Light Wave ($439.95), which looks like a piece of modern art. Or for the absolute best in performance, the Big Ass Fans Haiku (starting around $1,344) brings smart tech and an award-winning design to the table. Investing in a premium fan gets you better engineering and a design that makes a statement.
Gathering Your Tools and Safety Essentials

Alright, before we even think about touching the fan itself, let's talk prep. Nothing derails a DIY project faster than having to stop mid-job to hunt for a tool or making a panicked run to the hardware store. Taking a few minutes to gather everything you need is the secret to an installation that feels smooth and professional, not frantic.
First and foremost, you need a sturdy stepladder. I can't stress this enough—this is no time to balance on a wobbly kitchen chair. You’ll need a stable platform that lets you work comfortably with both hands over your head. A shaky setup is just asking for trouble, so make sure your ladder is the right height and on solid, level ground before you start.
Your Essential Toolkit
Beyond the basics like screwdrivers, a few key tools will make this job so much easier. Here's a quick rundown of what I always have within arm's reach before climbing up that ladder.
- Non-Contact Voltage Tester: This little gadget is your best friend for safety. It confirms the power is off without you ever having to touch a potentially live wire. Don't start without one.
- Wire Strippers/Cutters: You need these for clean, precise cuts and to strip wire insulation properly. A solid connection depends on it.
- Drill with Phillips and Hex Bits: This will be a huge timesaver, from taking down the old light fixture to locking in the new fan bracket.
- Adjustable Wrench: Great for tightening down the nuts that secure the mounting bracket and downrod.
- Safety Glasses: This is non-negotiable. You'll be looking up a lot, and you do not want dust, drywall bits, or anything else falling into your eyes.
Having this kit ready means you can stay focused. It's especially important if you're installing a premium model like the Fanimation SculptAire ($509.98), where the precision-engineered parts deserve a careful, well-equipped approach.
The Golden Rule of Electrical Work: Before you touch a single wire, march over to your circuit breaker, find the right one for the room, and flip it off. Then, go back and double-check the wires in the ceiling box with your voltage tester. It should give you a big, fat nothing. This isn't just a tip; it's the most critical safety step you'll take.
Preparing for a Premium Installation
If you've invested in a higher-end fan, say something like the gorgeous Modern Forms Wynd (around $649), your prep work should match the quality of the product. These fans often come with advanced features and are meticulously balanced right out of the box.
To give a fan of this caliber the installation it deserves, I'd add a couple more things to the toolkit:
- A small level: Use this to make sure the mounting bracket is perfectly horizontal. It’s the first step in preventing a wobbly fan down the road.
- A headlamp: It can get surprisingly dark looking up into a ceiling box. A headlamp keeps your hands free and shines a light right where you need it.
- Painter's tape and a marker: Perfect for labeling wires if your setup is more complicated than the standard black, white, and ground.
Taking these extra few steps will elevate your project from just "done" to "done right." It’s how you ensure that beautiful new fan not only looks fantastic but performs silently and safely for years. With your gear ready and your safety checks done, you're ready to get started.
Taking Down the Old Fixture and Getting the Ceiling Ready

Alright, with your tools handy and the power confirmed off, it's time to bid farewell to that old light fixture. This is where you get to make a clean slate for your new fan, and taking a few minutes to do it right will make the rest of the job go so much smoother.
Hop on your stepladder and start by removing any glass shades or light bulbs. Once those are out of the way, find the screws holding the canopy (the decorative plate flush with the ceiling) in place. Loosen them, and the fixture's base should drop down, giving you your first look at the electrical box and wiring.
That First Look at the Wires
Before you disconnect a single thing, grab your phone. Take a quick picture of how the wires are connected. Trust me on this one—this simple snapshot can be a huge help if you get turned around later and need to remember what the original wiring looked like.
Now, double-check with your voltage tester. Carefully touch the tip to each wire connection to be absolutely certain the power is off. Once you've confirmed it's dead, you can start taking things apart. The little plastic wire nuts twist off counter-clockwise. You'll likely see a black wire, a white wire, and a green or bare copper wire. Gently pull them apart.
With the wires free, the only thing left is the old mounting bracket screwed into the electrical box. It's a good idea to have someone spot you here, or just be ready to support the fixture with one hand while you unscrew the bracket with the other. Once it's loose, lower the old fixture down and set it aside. You're officially ready for the next step.
Inspecting the Electrical Box
With the old light gone, you’ve got a clear view of the single most important component for a safe installation: the electrical box. I can't stress this enough—skipping a thorough inspection here is the number one cause of wobbly, noisy, and potentially dangerous fans.
Take a close look at the box itself. If it’s plastic, that's a hard stop. A plastic box just doesn't have the strength to support the weight and motion of a ceiling fan. You need to see a metal box, but even that's not the final word. That box must be anchored directly to a ceiling joist or a specialized fan-rated brace spanning between two joists.
Here's the critical detail: The box needs to be stamped with a label saying "Acceptable for Fan Support" or list a weight rating, like 70 lbs. If you don't see that marking, you can't hang your fan from it. A standard junction box is only meant for a static, lightweight fixture, not the constant rotational force of a spinning fan.
What to Do If Your Box Isn't Fan-Rated
If you discover your box isn't up to the task, don't sweat it. This is a super common issue in older homes, and there's a straightforward fix: installing a fan-support brace. The best part is that most are designed to be installed right through the existing hole in your ceiling, so you won't have to get into any major drywall repair.
An expandable brace, like the widely available Westinghouse Saf-T-Brace, is a brilliant piece of engineering. You simply push it up through the hole and twist the bar. As you twist, the ends expand and dig securely into the ceiling joists on either side, creating a rock-solid anchor. This provides the robust support needed for even heavier, designer models like the gorgeous Artemis IV Ceiling Fan by Minka-Aire ($499.95), ensuring it runs silently and without a hint of wobble.
Once the brace is tightened down, you just attach the new fan-rated electrical box that came with it. Now you have a secure, code-compliant foundation for your new fan. Getting this part right is everything—it's what guarantees your fan will be safe, stable, and a source of comfort for years to come.
Assembling and Wiring Your New Fan
Alright, this is where your box of parts finally starts to look like a fan. So far, it's all been prep work and checking your setup. Now for the fun part—putting it all together.
My best advice? Do as much of the assembly as you can on the ground before you even think about getting back on that ladder. It seriously cuts down on the time you spend with your arms over your head and makes the whole process feel way less intimidating.
Think of it as building a model, just bigger. I always lay out a soft blanket or a piece of the fan’s own cardboard packaging on the floor. This little trick protects both your fan's finish and your flooring from any accidental scratches and gives you a clean workspace.
Building Your Fan on the Ground
First things first, let's get those blades ready. Most fans have you attach the blades to their brackets (sometimes called blade irons) before mounting them to the motor. Use the screws they provide and get them snug, but don't go crazy and overtighten—you could strip the screw or even crack the blade. Trust me, it's a lot easier to get these aligned perfectly now than it is when you're balancing three feet off the ground.
Next up, the downrod. That's the pipe connecting the motor housing to the mounting bracket on the ceiling. You'll spot a small pin and a cotter pin on one end. Just loosen the setscrew on the motor housing, slide the downrod into place, and lock it in by reinserting both pins. This connection is everything for a stable, wobble-free fan.
Here’s a pro tip that will save you a headache later: carefully feed the fan’s electrical wires up through the downrod now. Gently guide them so you don’t scrape or damage the insulation. Once the wires are through, you can slide on the decorative canopy and its cover ring. Just let them rest on the motor housing for now; we'll come back to them at the very end.
Demystifying the Wiring Process
With the fan mostly built, it’s time to tackle the wiring. I know this part sounds intimidating, but it’s usually just a simple color-matching game. This is the final step in turning a collection of parts into a fixture that actually works.
Remember that photo you took of the old fixture’s wiring? Now’s a good time to pull it out. Fan wiring is pretty standard, but it never hurts to have a reference, especially if your home’s wiring has a few quirks.
Most modern fans include a small hook on the mounting bracket designed to hold the fan's weight while you connect the wires. This feature is an absolute game-changer, freeing up both your hands. Go ahead and lift the fan assembly and hang it on that hook. It’s a simple, brilliant design that makes the job ten times easier, especially if you’re working solo.
This diagram shows the key players you'll be working with as you connect the fan to your ceiling's electrical box.
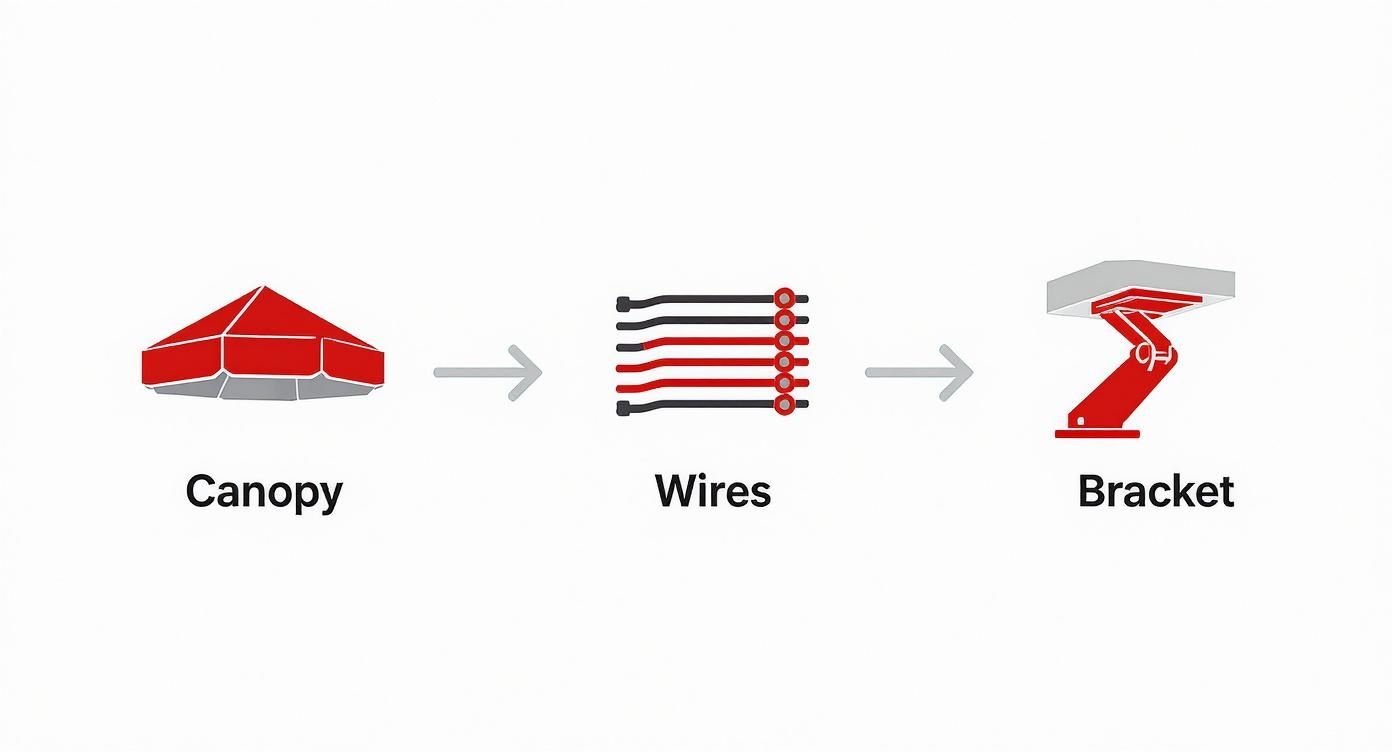
The process is straightforward: you'll expose the wires, hang the fan on the mounting bracket, and then make your connections.
Now, let's get those wires connected. You’re simply matching the wires coming from your ceiling to the wires on your new fan.
- Black to Black: This is your "hot" or power connection. Connect the black wire from the ceiling to the black wire from the fan.
- White to White: This is your "neutral" connection. Match the white wire from the ceiling to the white wire from the fan.
- Green/Copper to Green: This is the "ground" wire. Connect the green or bare copper wire from the ceiling to the green ground wires on both the mounting bracket and the fan motor itself.
See a blue wire? That's for the light kit. If your fan has one, you'll connect this blue wire along with the fan's black wire to the black "hot" wire from the ceiling.
To make a rock-solid connection, hold the bare ends of the matching wires together and twist them clockwise with your pliers before screwing on a wire nut. Give each wire a gentle tug to make sure it’s secure. If you have a remote receiver, just follow the diagram to wire it in between the ceiling and the fan. For a more detailed guide on that, check out the ceiling fan wiring diagram with remote control on our blog.
Once everything is connected, carefully tuck the wires and receiver (if you have one) up into the electrical box. This is where a premium fan like the Minka-Aire Artemis IV ($499.95) really shows its value—they often design canopies with more space and smarter harnesses, making this final step surprisingly easy. Now you’re ready to mount it flush to the ceiling.
Mounting the Fan and Finishing Up
Alright, this is the moment of truth—when all that prep work pays off and your fan finally meets the ceiling. It’s the most rewarding part of the job, and thankfully, modern fan designs make it a whole lot easier than it used to be.
One of the best features I've seen on new fans is a small but brilliant hook or slot built right into the mounting bracket. This thing is an absolute game-changer, especially if you're working alone. It lets you hang the entire fan assembly, freeing up both hands to deal with the wiring. No more awkward balancing acts.
Go ahead and carefully lift the fan assembly and hang it on the bracket's hook. Let it hang securely, take a breath, and admire your work. With the fan’s weight supported, you have all the room and freedom you need to make those final connections without any stress.
Securing the Canopy for a Clean Look
Once your wiring is done and the wire nuts are snug, it's time to hide everything for that clean, professional finish. Gently tuck all the wires—and the remote receiver, if you have one—up into the electrical box. Take your time here; you don't want to force anything and accidentally damage a connection.
Now, lift the canopy up so it's flush against the ceiling, sliding it right over the mounting bracket. You're aiming for a perfect fit with no gaps. This is one of those moments where you can really tell the difference between a cheap fan and a quality one.
Higher-end models, like the gorgeous Fanimation SculptAire ($509.98), often have smarter canopy designs that make this step a breeze. Secure it with the provided screws, tightening them evenly until the housing is firm against the ceiling.
A perfectly flush canopy is the hallmark of a job well done. If you see a gap, don't just crank down on the screws. Lower the canopy, check for any pinched or bunched-up wires, and try again. A little patience now prevents a wobbly fan later.
This attention to the user experience is a big reason why investing in a quality fixture pays off. The global ceiling fan market, valued at around USD 14.6 billion in 2025, is only growing as people demand smarter, more efficient models that are easier to install and live with.
Attaching the Blades and Light Kit
With the motor housing securely in place, you're on the home stretch. Most fans are designed so you attach the blades at this stage. It's usually a simple matter of aligning the blade brackets with the screw holes on the motor and tightening them down. Make sure each one is good and snug to prevent wobbling later on.
If your fan has a light kit, that's the last piece of the puzzle. It typically connects with a simple plug-in wiring harness and a few screws. Just plug it in, secure the fixture, and then install the glass shade and bulbs.
Of course, if you're working with low ceilings, you might be using a totally different style of fan. Flush mount, or "hugger," models are made for these spaces, mounting directly to the ceiling without a downrod. You can learn more about when to use one in our guide on what a flush mount a ceiling fan is.
Finally, do one last check on every single screw, from the mounting bracket to the blades. Your fan is now fully installed and ready for its first spin! Next up, we'll walk through the final checks and balancing.
Final Checks, Balancing, and Troubleshooting
You’ve done it! The fan is up, the blades are on, and your project is looking fantastic. Now for the moment of truth.
Go ahead, flip that circuit breaker back on, and let's put your handiwork to the test.
Grab the remote or pull the chain and turn the fan on its lowest setting. Watch it spin for a moment, then cycle through all the speeds—low, medium, and high. Everything should operate smoothly. Next, test the light if your fan has one. If everything is working just right, give yourself a well-deserved pat on the back.
But what if you notice a little shimmy? Don’t panic! A wobbly ceiling fan is one of the most common issues DIYers run into, and it's almost always a simple fix. It doesn't mean you messed up; it just means a little fine-tuning is needed to get things perfect.
Taming the Wobble With a Balancing Kit
Your fan likely came with a small balancing kit tucked away in the box. It might look a little strange—just a plastic clip and some small adhesive weights—but this little kit is pure genius. The whole idea is to figure out which blade is throwing the fan's balance just slightly off-kilter.
Here’s the process I've used countless times:
- Turn the fan off and wait for the blades to stop completely.
- Slide the plastic clip onto the trailing edge of any fan blade, about halfway out from the motor.
- Turn the fan back on. Is the wobble better or worse?
- Repeat this process, moving the clip from blade to blade. You'll quickly discover one blade where the clip either dramatically improves the wobble or makes it much more obvious. That's your culprit!
Once you've zeroed in on the problematic blade, you can start using the adhesive weights. Place a weight on the top center of that blade, directly in line with where the clip was. This tiny adjustment is usually all it takes to achieve a perfectly smooth, silent spin. For a high-end model like the impressive Kichler Terna LED Fan ($349.99), a proper balance is key to ensuring its unique design performs flawlessly.
Don’t just live with a wobbly fan. Taking ten minutes to balance it not only eliminates the annoying shimmy but also reduces stress on the motor and mounting hardware, extending the life of your fan for years to come.
Quick Fixes for Common Fan Issues
While wobbling is the top contender, a few other minor things can pop up after an install.
A faint humming sound, for example, is often caused by the wall switch. Many standard light dimmers aren't compatible with fan motors and can cause that annoying buzz. Replacing it with a dedicated fan-rated speed control switch usually solves the problem instantly.
Flickering lights are another common hiccup. Before you start worrying about the wiring, just double-check that the bulbs are screwed in snugly. The fan's vibration during operation can sometimes loosen them just enough to cause a flicker.
It’s interesting to see how universal these installation details are, even though fan popularity varies wildly across the globe. A detailed market analysis from 2024 shows that Asia Pacific holds a commanding 63.38% share of the ceiling fan market, driven by urbanization and a need for affordable cooling. You can explore more about these global trends in this insightful market report.
By running these final checks, you’re not just finishing a project—you’re perfecting it.
Common Questions After You Install a Ceiling Fan
Got your fan up and spinning? Awesome. Even when the job's done, a few questions tend to pop up. We hear these all the time, so let's clear them up.
Can I Install a Ceiling Fan Where a Light Fixture Is?
Absolutely! This is one of the most common DIY swaps out there. The wiring is usually the same, which makes it a pretty straightforward job.
But there’s one crucial catch: the electrical box in your ceiling. A standard box made for a lightweight fixture just can't handle the weight and constant vibration of a spinning fan. You must make sure the box is fan-rated. If it’s not, you'll need to replace it with a proper support box or brace to keep everything secure. Safety first.
How High Should a Ceiling Fan Be From the Floor?
For safety and to get the best airflow, you want the fan blades to be at least 7 feet off the floor. The sweet spot for performance, though, is right around 8 to 9 feet.
- Got standard 8-foot ceilings? A flush-mount or "hugger" style fan is going to be your best bet.
- For ceilings 9 feet or taller, you'll need a downrod to bring the fan down to that ideal height in the room.
My New Ceiling Fan Wobbles—What Did I Do Wrong?
Relax, you probably didn’t do anything wrong at all. A wobbly fan is almost always just a simple balance issue.
First, kill the power at the breaker. Then, go back and double-check that every single screw is completely tight—on the mounting bracket, the downrod, and where the blades meet the motor. If it still wobbles, grab the balancing kit that came in the box. Just attach the little plastic clip to one blade at a time, running the fan between each test until you find the culprit. Once you've found the unbalanced blade, stick one of the small adhesive weights on top to even things out.
A slight wobble isn't a sign of a failed installation—it's usually an easy fix. Taking a few minutes to balance the blades makes for smooth, silent operation and takes a lot of stress off the fan's motor in the long run.
Do I Need a Special Switch for a Ceiling Fan?
It really depends on the fan you chose. If you have a basic fan without a light, a standard on/off switch works perfectly fine.
If your fan has a light kit, you might want a dual switch so you can control the fan and light separately. That said, many of today’s premium fans come with a remote control, which simplifies everything. With a remote, all you need is a single, standard switch to supply power.
Ready to find a fan that brings together incredible design and perfect performance? Take a look through the hand-picked collections at Fan Connection and find the ideal centerpiece for your home. With stunning models like the sleek Minka-Aire Artemis IV ($499.95), you're not just buying a fan—you're investing in real comfort and style.


