


How to Replace a Ceiling Fan The Ultimate DIY Guide
Alright, let's talk about swapping out a ceiling fan. It's one of those DIY projects that feels incredibly satisfying once it's done, like you've conquered a real home improvement beast! At its core, it's pretty simple: power off, old fan out, new fan in. But the whole thing really comes down to two key things: being safe and making sure your ceiling can actually hold the new fan without any drama. This isn't just a chore; it's an upgrade, a chance to transform a room's vibe and comfort. So let's have some fun with it!
Before You Start: The Pre-Installation Checklist
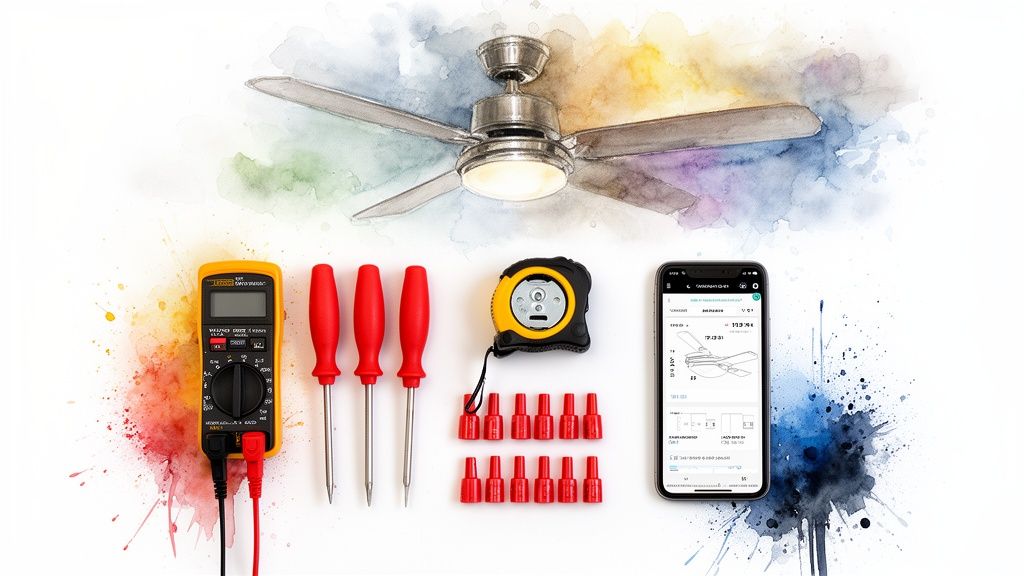
Before you even think about touching that ladder, let's get everything squared away. I always treat this part like a mission briefing—a thorough check of your tools, workspace, and the new fan itself is what separates a quick weekend win from a frustrating, drawn-out ordeal.
Trust me, success starts with having the right gear within arm's reach. There’s nothing worse than being up on a ladder, holding a heavy fan motor, only to realize you need a different screwdriver. Let’s make sure that doesn't happen to you.
Essential Toolkit for Ceiling Fan Replacement
Gathering your tools beforehand is a non-negotiable first step. Here's a quick rundown of what you'll absolutely need to get this done right.
| Item | Purpose | Pro Tip |
|---|---|---|
| Voltage Tester | Your #1 safety tool. Confirms 100% that the power is off. | Get a non-contact tester. You just hold it near the wires—no direct contact needed. Super easy and safe. |
| Sturdy Ladder | Provides a stable, safe work platform. | An A-frame stepladder is perfect. Avoid the temptation to use a wobbly chair or stool. Seriously. |
| Screwdrivers | For removing old hardware and installing the new bracket. | A multi-bit driver is your best friend here. It saves trips up and down the ladder. |
| Wire Strippers/Cutters | To cleanly strip wire insulation for a secure connection. | Most come with built-in cutters, perfect for trimming wires to the right length. |
| Pliers | Bending and maneuvering wires into place. | Needle-nose pliers are especially helpful for tucking wires neatly into the electrical box. |
Having these items ready will make the entire process smoother and, more importantly, safer.
A common mistake I see is people skipping the voltage tester. It’s a tiny investment that offers priceless peace of mind. Don't just trust the wall switch—always, always test the wires before you touch them.
Is Your Ceiling Ready for This?
Here’s a check that eager DIYers often skip, which usually leads to a wobbly, noisy fan. Not all ceiling electrical boxes are the same. The standard box for a lightweight light fixture often isn't rated to support the weight and constant motion of a ceiling fan.
Having the right prep leads to an 85% success rate for DIY installs, and that prep starts with the ceiling box. It absolutely must be rated to support at least 35 pounds—a surprising number of fan failures can be traced right back to a weak mount.
If the box feels flimsy or isn't secured directly to a ceiling joist, you'll need to replace it with a proper fan-rated model before you go any further. It's an extra step, but it's crucial.
Picking the Perfect Fan
Finally, the fun part—the fan itself! You want to make sure the fan's size is a good match for your room to get the best airflow. A fan that's too small will just spin without doing much, while one that's too big can feel like a wind tunnel. To get the perfect fit, you should check out our guide on how to choose a ceiling fan size.
If you're looking to make a real statement and invest in a high-quality upgrade, consider a premium model that's as much a piece of art as it is an appliance. A fantastic example is the Minka-Aire F844-DK Light Wave fan (retailing for over $300). It blends a sleek, modern look with a precision-engineered motor for whisper-quiet performance. It’s the kind of fan that becomes a true centerpiece, not just another appliance, completely transforming the feel of your room.
Getting the Old Fan Down Safely
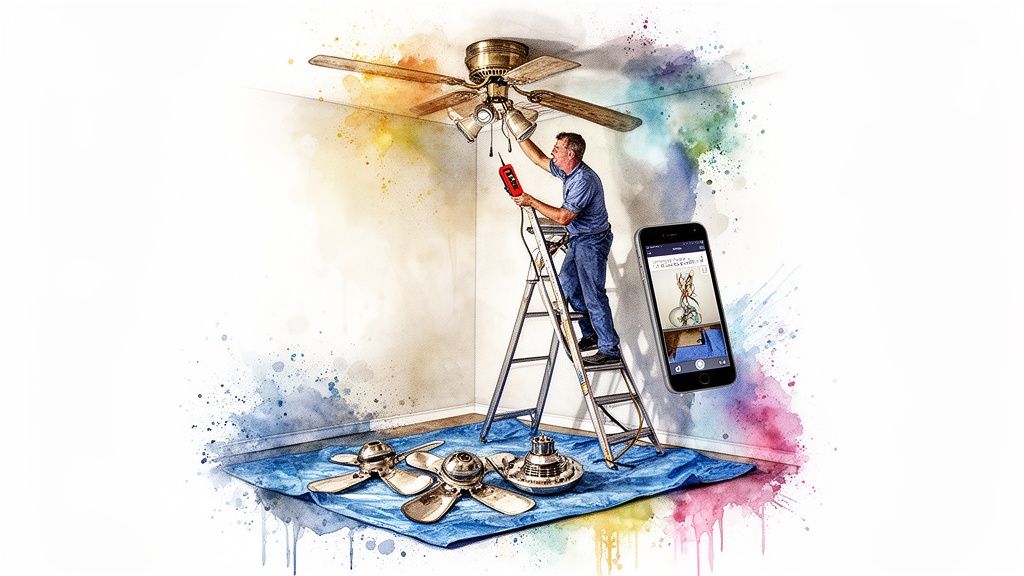
Alright, you've got your tools and you're ready to go. Now for the most important part of this whole job: getting the old fan down without any drama. This isn't a demolition project; think of it more like a careful disassembly. A little patience here keeps you safe and gives you a good mental roadmap for how the new fan will go up.
The first step is absolute and non-negotiable: kill the power. I don't mean just flipping the wall switch. Head straight for your circuit breaker panel, find the breaker for the room you're in, and shut it completely OFF.
Once you've done that, go back to the fan. Try the wall switch and tug on any pull chains. Nothing should happen. That's your first sign you're on the right track, but we're not done yet.
Make Absolutely Sure the Power Is Off
This is the step that separates a safe job from a painful mistake. Grab your non-contact voltage tester—it's your best friend for this project. You'll need to carefully remove the canopy (the decorative cone against the ceiling) to get a look at the wiring.
Now, hold the tip of your tester near each wire without actually touching them. If it stays quiet and dark, the power is officially off. This little check takes two seconds and is what stands between you and a nasty shock.
A straightforward swap can take less than two hours, but only if you put safety first. It's a sobering fact that around 15% of fan-related accidents are caused by live wires—a totally preventable error. For a deeper dive into home installation safety trends, you can check out the full report on the ceiling fan market.
The Smart Way to Disassemble
With the power confirmed off, it's time to start taking things apart. Trying to wrestle a fully assembled fan off the ceiling is a recipe for a sore back and a dropped motor. Let's lighten the load first.
- Start with the light kit. Usually, a few small screws hold the glass shades or the entire fixture to the motor. Get those off and set them aside.
- Next, the fan blades. Each blade is held on by two or three screws. Take them off one by one. This makes a huge difference in the weight and awkwardness of what you're handling on the ladder.
Pro Tip: Before you touch a single wire, grab your phone and snap a quick, clear photo of how everything is connected. This picture is your get-out-of-jail-free card if you get turned around later. It's a total lifesaver.
Disconnecting and Lowering the Motor
What’s left is the fan motor hanging from the mounting bracket. You'll likely need to lift it slightly off its hook or support to get to the wire connections.
This is where that photo you took comes in handy. Use your pliers or fingers to unscrew the plastic wire nuts connecting the fan to the ceiling wires. You'll usually see a standard setup:
- Black to Black (the hot wire)
- White to White (the neutral wire)
- Green/Copper to Green/Copper (the ground wire)
Once those wires are separated, the old motor is free. Carefully lower it down and move it out of the way. All that should be left is the old mounting bracket, which you can now unscrew from the ceiling box. Just like that, you have a clean slate, ready for your new fan.
Laying the Groundwork for Your New Fan
Alright, with the old fan gone, you're looking at a clean slate on your ceiling. This next part is the "measure twice, cut once" phase of the job. Getting this foundation right is what guarantees your new fan runs whisper-quiet and wobble-free for years to come. It all hinges on the new mounting bracket—the unsung hero of any ceiling fan install.
First things first: resist the temptation to reuse any of the old hardware. Your new fan came with a specific bracket and screws engineered for its particular weight and motor. Using the hardware it came with isn't just a suggestion; it's a non-negotiable step for a rock-solid, secure fit.
Get That New Mounting Bracket Secured
Start by carefully feeding the electrical wires from the ceiling box through the center hole of the new mounting bracket. Now, line up the slots on the bracket with the screw holes in your fan-rated electrical box. Grab the screws that came with the new fan and use them to attach it firmly to the box.
You'll want to tighten these screws until they are completely snug. I can't stress this enough: a loose bracket is the #1 cause of a wobbly fan, and it’s a real headache to fix once the motor is hanging in the air. Give the bracket a good, firm tug to make sure it doesn’t budge at all. It should feel like part of the ceiling.
This initial mounting step is absolutely crucial. While we're talking about ceiling fans, the basic principles of securely mounting a new unit are shared across similar projects, like you'd see in a general guide to fan installation. Nailing this bracket installation sets the stage for a smooth process from here on out.
The Pro Move: Assemble on the Ground
Here’s a tip that will save your arms and a whole lot of frustration: do as much of the fan assembly as you can on the floor. Trying to attach the downrod and feed tiny wires through it while balancing on a ladder is an unnecessary struggle. Let's get the tricky stuff done on solid ground.
Your fan’s instruction manual is your best friend for this part. Most models follow a pretty standard sequence:
- Attach the Downrod: Gently thread the fan's electrical wires up and through the downrod.
- Secure the Downrod: Screw the downrod into the top of the fan motor assembly. Most use a small cotter pin and a setscrew to lock it in place. Make absolutely sure that setscrew is tight!
- Slide on the Canopy: Don't forget this! Slide the decorative canopy and its cover plate over the downrod, letting them rest on top of the motor for now. Forgetting this step means you'll have to unwire everything later just to get it on. Trust me, you don't want to do that.
This ground-based assembly is a total game-changer. You can work comfortably, actually see what you’re doing, and ensure every connection is perfect before you have to lift the heavy motor into place. It transforms the final ceiling attachment from a struggle into a simple lift-and-hang motion.
A Note on Premium and Unique Designs
While most fans follow this general script, a high-end, design-forward model might have a few unique assembly steps. Take, for instance, the stunning Hunter 59264 Key Biscayne (priced at over $300). Its sculptural, weathered look is a big part of its appeal, so the assembly is engineered to keep those lines clean. The manual might specify a particular order for attaching decorative housing pieces.
When you invest in a fan like the Key Biscayne, you're not just buying an appliance; you're getting a centerpiece for the room. Following its specific instructions to the letter ensures the final product looks just as flawless on your ceiling as it does in the showroom.
Taking a methodical approach here is your key to success. Project stats show a whopping 92% of DIYers finish a fan replacement in one to three hours by following a guide. Key checkpoints include making sure the joist provides adequate support (an issue for 18% of older homes) and correctly torqueing wire nuts to prevent connection failures, which account for 28% of post-install callbacks.
By taking a few extra minutes to secure the bracket and pre-assemble the motor, you've set yourself up for a smooth and straightforward wiring process. You can find more details on the different types of hardware you might encounter in our guide on ceiling fan mounting bracket types. Now, you're ready for the big moment: lifting your partially assembled fan and hanging it on that new bracket.
Decoding the Wires for a Perfect Connection
Alright, let's get to the part that looks more intimidating than it really is: the wiring. I promise, you don't need an electrical engineering degree for this. Think of it more like a simple color-matching game. The goal here is just to make solid, safe connections that will power your new fan without any drama.
But before we even think about wires, we have to talk about the mounting point. Your fan has to be hanging securely from its bracket before you connect a single wire. This little decision tree breaks down the first, most important check you need to make.
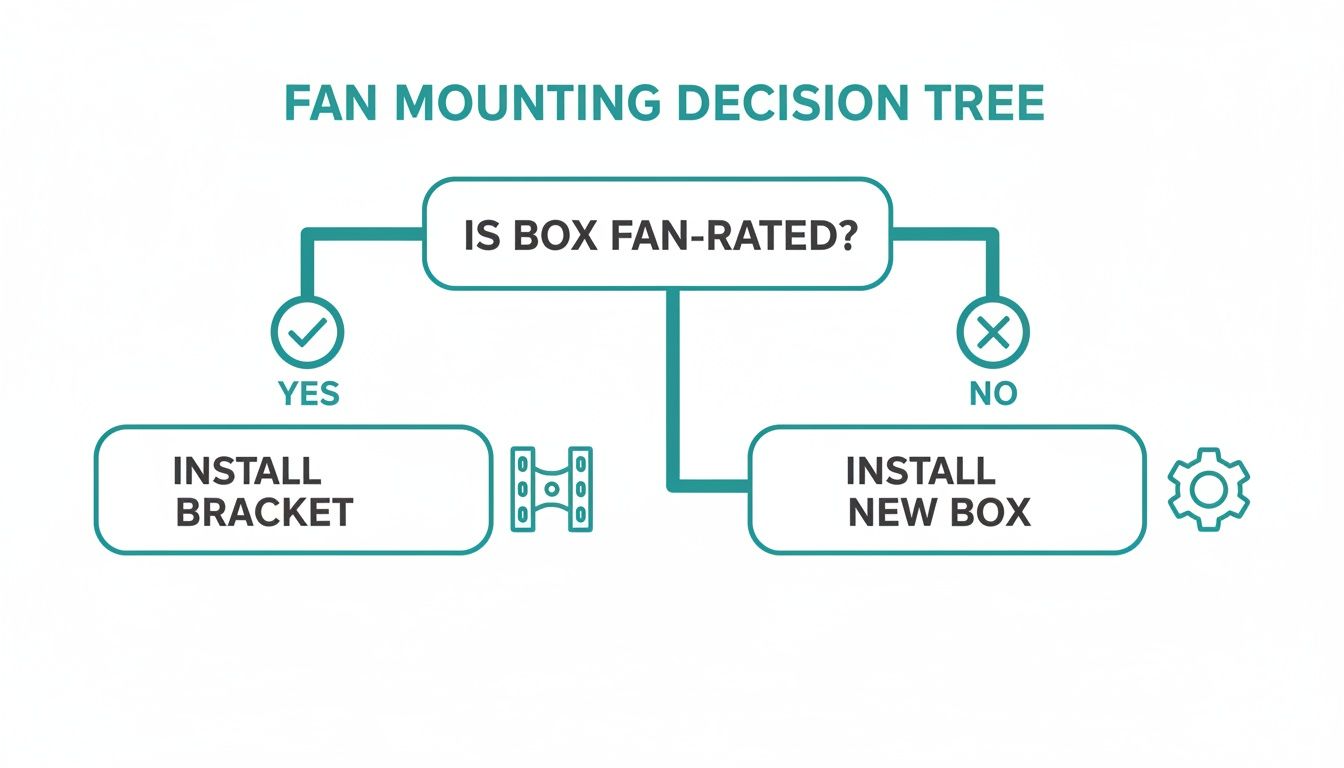
The takeaway here is non-negotiable: a standard electrical box built for a light fixture won't cut it. You absolutely must confirm the box is fan-rated before you move on.
The Basic Wiring Scenario
In most modern homes, the wiring you find in the ceiling is pretty straightforward. You should see three wires:
- Black: Your "hot" or power wire.
- White: The "neutral" wire.
- Green or Bare Copper: This is the ground wire, a key safety feature.
Your new fan will have a matching set of wires, so you’ll just connect like to like. Twist the exposed copper ends of the same-colored wires together—black to black, white to white—and then screw a wire nut tightly over each pair. Give each wire a gentle pull to make sure it's snug inside the nut.
For the ground wires, you'll connect all of them together: the one from the ceiling, the one from the fan, and the one from the mounting bracket itself.
Tackling More Complex Setups
What if you pull the old fixture and see more wires? Don’t sweat it. This usually just means you have more control over your new fan, which is a great thing!
A common setup involves an extra red wire coming from the ceiling. This is usually a second "hot" wire that’s connected to a separate wall switch, designed to control a light kit independently from the fan motor.
In this case, your fan will have a dedicated light wire, which is almost always blue. The connection looks like this:
- Black (Ceiling) connects to the Black (Fan Motor) wire.
- Red (Ceiling) connects to the Blue (Fan Light) wire.
- White (Ceiling) connects to the White (Fan) wire.
- All Ground Wires get connected together.
This two-switch setup is a fantastic feature for controlling the room's ambiance.
Pro Tip: When you're twisting on a wire nut, always turn it clockwise until it's firm. You should feel the wires twisting together inside the cap. A loose connection is the #1 cause of flickering lights or a fan that won't start.
To help you visualize these common scenarios at a glance, here’s a quick reference table.
Common Ceiling Fan Wiring Configurations
| Scenario | Ceiling Wires | Fan Wires | Connection Guide |
|---|---|---|---|
| Standard Single-Switch | Black, White, Ground | Black, White, Ground | Connect like-colors: Black-to-Black, White-to-White, all Grounds together. |
| Separate Fan & Light Switches | Black, White, Red, Ground | Black, White, Blue, Ground | Black (Ceiling) -> Black (Fan). Red (Ceiling) -> Blue (Fan Light). White-to-White, all Grounds together. |
| Adding a Remote Receiver | Black, White, Ground | Black, White, Blue, Ground | Ceiling wires connect to the receiver's "input" side. Fan wires connect to the receiver's "output" side. Match the colors as shown in the manual. |
This table should help you identify what you’re working with and make the right connections quickly.
Integrating a Remote Control Receiver
Most new fans come with a remote, which means you'll have a small black box—the receiver—to wire in. This little gadget is the brain of the fan, catching the signal from your remote and telling the fan motor and light what to do.
Think of it as a middleman. It has wires coming out of both ends: one set connects to your ceiling wires, and the other connects to the fan's wires. Just follow the fan’s manual to match the colors on both sides. The receiver itself is designed to slide right into the mounting bracket, tucked neatly beside the downrod.
This is one of those times where a quality fan really makes a difference. For instance, the Fanimation Studio Collection Slinger v2 fan, which retails for over $400, includes a streamlined receiver and crystal-clear instructions that make this part of the job a breeze. Higher-end models are designed to fit together easily, saving you from the frustration of cramming bulky components into a small space. For a deeper dive, our guide on ceiling fan wiring diagrams with a remote control has detailed visuals for these setups.
Once every connection is made and you've double-checked your work, it's time to gently tuck all the wiring and the receiver up into the ceiling box. Take your time arranging everything so you don't pinch any wires when you slide the canopy into place. After that, you're ready to secure the canopy and move on to the final steps.
Final Assembly and Achieving a Perfect Balance
Alright, you're in the home stretch now. This is where all your careful work pays off and the fan finally starts to look like a fan. We'll get the blades on, hook up the light, and then run it through its paces to make sure it's running smooth and silent.
Don't rush this part. A few extra minutes of attention here can save you from dealing with an annoying, wobbly fan down the road.
Installing the Blades and Light Kit
With the motor assembly hanging securely, it's time to attach the fan blades. You'll typically screw the blade irons (the metal brackets) onto the blades first, and then mount those completed assemblies to the motor.
Here’s a little tip: when attaching the blades to the motor, get one screw started for each blade before going back to tighten them all down. This helps everything sit flush and prevents any one blade from being misaligned. Uneven tension is one of the sneakier causes of a wobble right out of the box.
Next up is the light kit. Most modern fans make this incredibly simple, often with a single plug-in connector and a few screws to hold it in place. If your fan has an integrated LED light, it's usually one sleek unit. These are fantastic because they're built to last, with some rated for an incredible 25,000 hours of use.
If your model uses standard bulbs, like E27 or B22 screw-in types, just make sure everything is connected securely before you pop on the glass shade.
The Moment of Truth: Testing Your New Fan
With everything fully assembled, it's time for the big reveal. Give the fan a quick once-over to make sure you didn't leave any tools sitting on it, then head back to the circuit breaker.
Flip the power back ON.
Now for the fun part. Grab your wall switch or remote and put the fan through its paces. Check every single function to make sure your wiring is spot-on.
- Fan Speeds: Run it through low, medium, and high.
- Light Function: Flip the light on and off. If it’s dimmable, test the range from low to bright.
- Reverse Switch: Check the reverse function for winter use.
As the fan spins up to its highest speed, just watch it. A tiny bit of movement is totally normal, but if you see a noticeable wobble or shimmy, don't worry—it just means it's time for a little fine-tuning.
Don't panic if you see a wobble. It's an incredibly common issue and usually an easy fix. It doesn’t mean you bought a lemon or messed up the installation; it just needs a tiny adjustment to get everything in perfect harmony.
Conquering the Wobble with a Balancing Kit
That annoying wobble is almost always caused by a minuscule weight difference between the fan blades. The good news is that nearly every new fan comes with a balancing kit right in the box. It’s usually just a small plastic clip and a few sticky-backed weights.
The process is a simple game of elimination:
- Turn the fan off and clip the plastic clip onto the trailing edge of any blade, about halfway out from the motor.
- Turn the fan on high. Is the wobble better or worse?
- Turn it off again, and move the clip to the next blade. Repeat until you find the blade where the clip makes the wobble almost disappear.
Once you've found the problem blade, you can slide the clip back and forth along its edge to find the "sweet spot." When you've nailed it, just stick one of the adhesive weights on the top of the blade, right where the clip was. For a more detailed guide, check out our article on how to balance a ceiling fan.
This is one of those areas where you really see the difference a premium fan makes. A high-quality model like the Casablanca Wisp fan, which retails for over $350, is built with such precisely balanced components that a wobble is incredibly rare. The superior engineering often means you get to skip this step entirely and enjoy a perfectly stable fan from the very first flip of the switch.
Your Top Ceiling Fan Questions Answered
Even the most straightforward project can leave you with a few lingering questions. When you’re dealing with something like replacing a ceiling fan, it's totally normal to want a little extra reassurance before you flip that breaker back on.
Let's walk through some of the most common questions people ask during this process so you can wrap up your installation with confidence.
Can I Really Replace a Ceiling Fan Myself?
For most homeowners, absolutely. If you're doing a simple swap—one old fan out, one new fan in—and your home has modern wiring, this is a very manageable DIY project. As long as you're diligent about safety, especially killing the power and double-checking with a voltage tester, you've got this.
But here's the reality check: if you open that electrical box and see wiring that looks ancient, brittle, or just plain confusing, it’s time to pause. There's no shame in calling a licensed electrician. In fact, it's the smartest move you can make. Safety always, always comes first.
What if My Wiring Colors Do Not Match?
This is a classic "stop and think" moment. In a perfect world, you'll see the standard black (hot), white (neutral), and green or bare copper (ground) wires. If your ceiling box has a different color scheme, stop immediately.
Don't guess. Your first stop should be your new fan’s instruction manual, which often has diagrams for less common setups. A red wire, for instance, is often a second hot wire for controlling a light kit from a separate wall switch. But assumptions are dangerous with electricity. If the manual doesn't clear things up, it's time to call in a pro to safely identify the wires.
How Do I Choose the Right Fan Size?
Getting the size right is crucial for performance. A fan that’s too small for the room just won't move enough air to make a difference. On the other hand, one that's too big can create an annoying, gusty draft. The goal is to match the fan's blade span to your room's square footage.
- Small Rooms (up to 75 sq ft): Look for a fan under 36 inches.
- Medium Rooms (76-144 sq ft): A 36 to 42-inch fan is your sweet spot.
- Standard Rooms (145-225 sq ft): Go with a model between 44 and 50 inches.
- Large Rooms (up to 400 sq ft): You’ll need a fan that is 52 inches or larger.
A Quick Note on Maintenance: Now that your new fan is up, a little upkeep will go a long way. Knowing how to clean ceiling fans properly will protect your investment and keep it running smoothly for years.
Don't forget to factor in ceiling height, too. For any ceiling over 9 feet, you'll want a longer downrod to bring the fan down to its ideal height—about 8-9 feet from the floor. This simple adjustment ensures the airflow actually reaches you. Little details like this, and even knowing how to reverse ceiling fan direction for seasonal use, make all the difference in year-round comfort.
At Fan Connection, we believe the perfect fan does more than just move air—it elevates your entire space. If you're ready to upgrade to a fan that combines flawless design with powerful, quiet performance, explore our curated collections. A standout choice for modern living rooms is the Kichler Sola fan, a masterpiece of form and function available for over $400. Its bold yet elegant design makes a statement while delivering exceptional airflow.
Discover the Sola and other exceptional models at https://www.fanandlights.com.


