


How to Wire a Ceiling Fan Switch Without Calling an Expert
So you've got a brand-new ceiling fan, and you're ready to bask in its glorious breeze. But first, the switch! Before we dive into the electrifying fun of wiring, we have to tackle the essentials. Getting the prep work right is what separates a smooth, successful project from a frustrating weekend and a potentially shocking outcome. This isn't just about grabbing tools—it's about setting the stage for a safe and ridiculously satisfying installation.
The number one, non-negotiable, golden rule of any electrical work is this: turn off the power at the circuit breaker. Don't just flip the wall switch like you're turning off a lamp. March over to your electrical panel, find the correct circuit, and shut it down with authority.
Your Essential Safety and Tool Checklist
Think of this as your pre-flight check for an awesome DIY mission. A messy, incomplete setup is a recipe for mistakes and maybe a few choice words. Having everything you need, clean and organized, makes the whole process feel less like a chore and more like a conquest.
Must-Have Tools for the Job
You don't need a professional workshop, but a few key tools are non-negotiable if you want to do this safely and correctly. Good tools make the job easier, safer, and frankly, more fun.
- Non-Contact Voltage Tester: This little gadget is your new best friend. Even after you've flipped the breaker, you must test every single wire to confirm it’s deader than a doornail. It’s an inexpensive tool that can literally save your life. No excuses!
- Wire Strippers: Forget using a knife—that’s how you nick the copper and create a sneaky fire hazard. A proper wire stripper gives you clean, perfect cuts every time without damaging the precious conductor.
- Needle-Nose Pliers: Essential for bending wires into that perfect little hook shape to loop around terminal screws. They're also brilliant for maneuvering wires in a crowded electrical box.
- Insulated Screwdrivers: You'll want a set with both Phillips-head and flat-head drivers. The insulated handles provide an extra layer of safety, just in case a stray electron decides to get frisky.
A huge mistake I've seen people make is assuming the breaker labeled "Bedroom" controls everything in that room. Always, always use your voltage tester on the exact switch box you're working on. Double-checking isn't paranoia; it's what keeps you safe and sound.
With your tools ready, you're almost there. But before opening up that switch box, it helps to see the bigger picture. Our guide on how to install a ceiling fan covers the entire project from start to finish.
Demystifying the Wires in the Box
Alright, power is off and confirmed dead. You've removed the old switch plate and pulled the switch out. Now you're looking at a small jumble of wires. It might look like a tangle of spaghetti, but each one has a specific job, and we're about to make sense of it all.
Here’s the standard color code you’ll find in most modern homes in the U.S.:
- Hot Wire (Black): This is the live wire, the powerhouse bringing electricity from your breaker panel to the switch.
- Neutral Wire (White): This wire completes the electrical circuit, acting as the return path for the current back to the panel.
- Ground Wire (Green or Bare Copper): This is your safety net. If there’s a fault, it gives the electricity a safe path to the ground, preventing a nasty shock.
Sometimes you'll see a red wire in the mix. That's usually a second hot wire, often used to control a fan's light kit separately from the motor. We'll get into those specific setups later. For now, just focus on identifying these main wires. Get this part right, and the rest of the job will be a breeze.
The Two Most Common Wiring Scenarios
Alright, you’ve done your homework, killed the power, and you can tell your hot from your neutral. Now for the fun part: actually wiring the switch. This is where you decide how you want to live with your fan. Will it be a simple on-and-off affair, or do you want the glorious flexibility to control the fan and light separately? Let’s get into it.
The Classic Single Switch Setup
This is wiring in its most straightforward, no-frills form. One switch controls everything—the fan motor and the light kit power up and shut down together. It’s the perfect solution when you’re replacing an old light fixture and only have a single switched wire running to the ceiling box.
The goal is simple: get power from the switch to both the fan’s motor (the black wire) and its light (the blue wire) at the same time.
Here’s how it typically shakes out:
- Inside the Wall Box: Your incoming hot wire (black) from the breaker panel will connect to one of the screw terminals on the switch. The other hot wire (also black) that runs up to the ceiling connects to the other terminal.
- Up in the Ceiling Box: This is where the magic happens. The single hot wire coming from your wall switch needs to feed both the fan and the light. You’ll join it with the fan's black wire and its blue wire, twisting all three together securely under a single wire nut.
- Neutrals and Grounds: Don't forget the easy ones! All the white neutral wires get connected together, and all the bare copper or green ground wires get connected together.
It's a clean, effective setup. The only real downside is that you can’t have the fan running on its own without the light on, which might not be ideal for a cozy movie night.
This is a good moment to pause and remember the golden rule of electrical work: safety first, always.
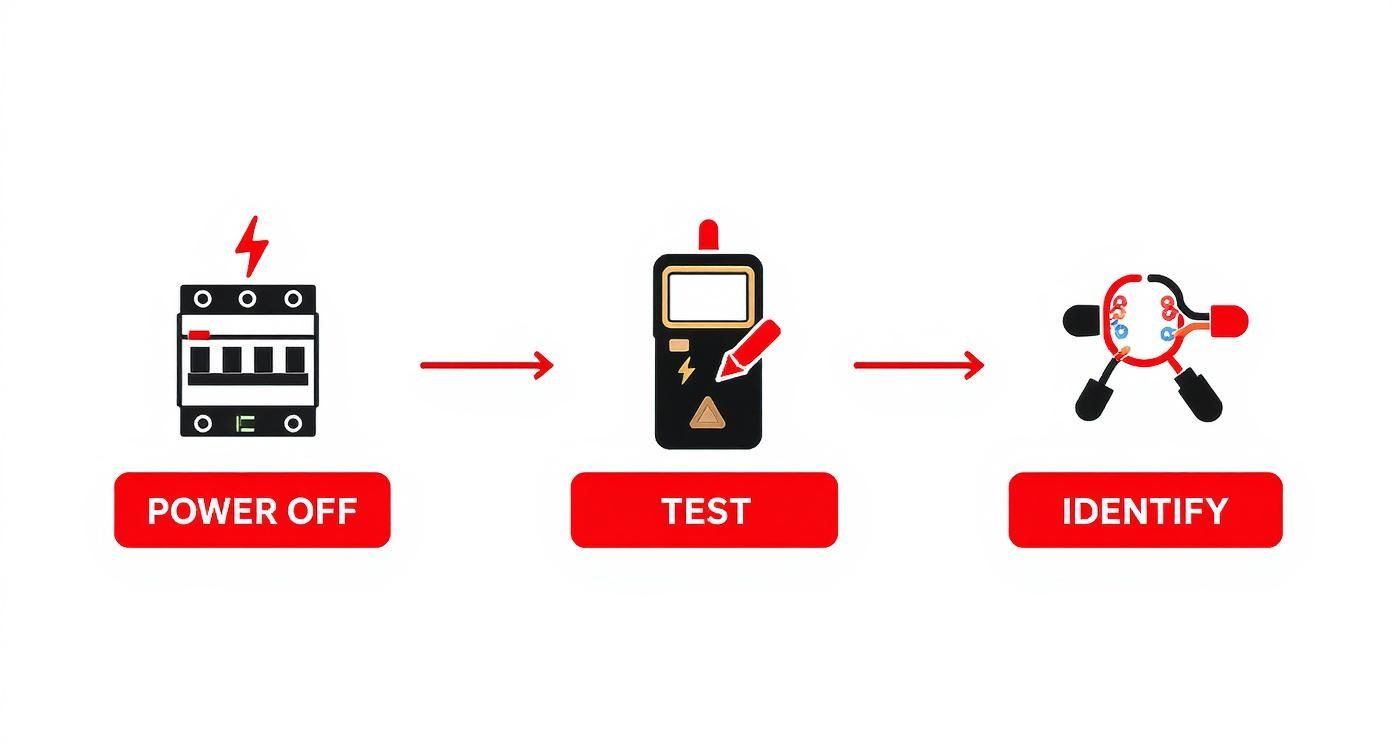
No matter the setup, following this sequence—power off, test, identify—is non-negotiable. It’s what separates a successful DIY project from a dangerous mistake.
Upgrading to a Dual Switch for Total Control
If you want the ultimate flexibility, a dual switch is the only way to go. This gives you independent control over the fan and light from one convenient spot on the wall. To make this happen, you need an extra wire running from the switch to the ceiling. This is what electricians call a 3-conductor wire—it contains a black, red, white, and ground wire. That red wire is the key to your dual-control kingdom.
Pro Tip: If you're struggling to fit multiple wires onto a single screw terminal in a crowded box, use a "pigtail." Just take a short 6-inch piece of wire, connect it to the switch, and then use a wire nut to join that pigtail with the other wires. It makes for a much cleaner and more secure connection.
Here’s how the dual setup comes together:
- The incoming hot wire (black) from your panel connects to the common or "line" terminal on your dual switch.
- The black wire running up to the ceiling connects to the switch terminal that will control the fan motor.
- The red wire running up to the ceiling connects to the other terminal, which will control the light kit.
- Up at the fan, you’ll connect the black wire from the switch to the fan's black motor wire, and the red wire from the switch to the fan's blue light wire.
With millions of ceiling fans being installed every year, knowing how to handle both simple and advanced wiring is a skill in high demand. The global ceiling fan market hit around USD 11.39 billion recently, and with the Asia-Pacific region alone making up 63.38% of that, it’s clear these fixtures are a staple in homes everywhere. Proper installation isn't just about convenience; it’s about safety and getting the performance you paid for.
Of course, many modern fans now come with remote controls, which can feel like it throws a wrench in the works. It’s actually pretty simple once you see it laid out. To understand how a remote receiver fits into the equation, take a look at our guide on the ceiling fan wiring diagram with a remote control.
For a high-end fan like the gorgeous Maverick 60" by Monte Carlo, a six-bladed masterpiece starting at $730, you’ll almost certainly be working with a remote and an efficient DC motor. Pairing a premium fan like this with a proper dual-switch setup ensures you can enjoy every feature it has to offer.
Integrating Dimmers, Speed Controls, and Smart Switches
Moving beyond a simple on/off switch is where you can really start to dial in your room's comfort and ambiance. This is your chance to add dimmers for mood lighting, sliders for perfect fan speed, and even smart controls for total automation. These advanced switches do more than just open and close a circuit—they intelligently manage the power going to your fan and light.
Wiring these combination switches takes a bit more finesse than a standard toggle. Instead of just a single "line" and "load" terminal, you'll usually find separate outputs—one for the fan motor and one for the light kit. This is exactly why having that 3-conductor wire (with the extra red wire) we talked about earlier is so crucial for these kinds of upgrades.
Wiring Multi-Function Switches
Let's say you're installing a combo switch with a dimmer slider for the light and a separate three-speed slider for the fan. The wiring builds on the same logic as a dual-switch setup, just packed into one device.
- Line Connection: The incoming hot wire (black) from your breaker connects to the common "line" terminal. This is the single power source for the whole unit.
- Fan Load Connection: The black wire running up to the ceiling connects to the terminal labeled "fan" or "motor." This dedicated path ensures the speed control only affects the fan.
- Light Load Connection: The red wire heading up to the ceiling connects to the terminal marked "light." This routes power through the dimmer, letting you adjust brightness without changing the fan speed.
This separation is absolutely key. You can't just stick a standard light dimmer on a fan motor—it'll cause an awful humming noise and can eventually burn out the motor. A proper multi-function switch is designed to handle each type of load correctly. For a deeper dive into the different options, our guide on choosing the right switch for your ceiling fan is a great resource.
The Exciting World of Smart Switches and Remotes
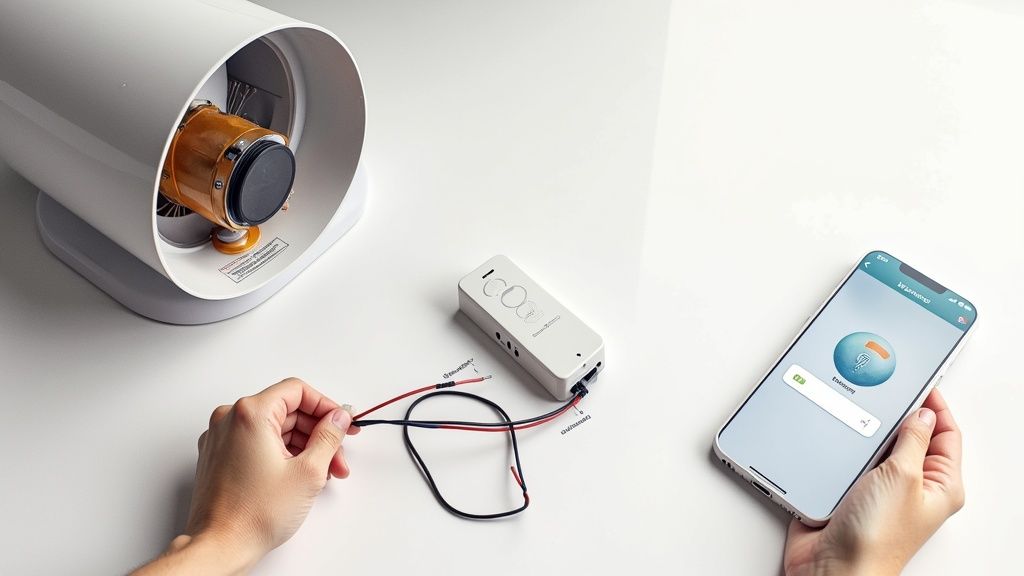
Now for the really fun part: bringing smart controls into the mix. This is how you connect your ceiling fan to your digital life, unlocking voice commands, scheduling, and app control from anywhere. Most smart fan kits rely on a small receiver module that gets installed inside the fan's mounting canopy at the ceiling.
This little box is the brain of the operation. It gets a constant supply of power from the wall switch and then listens for signals—from a remote or a smart hub—to manage the fan's light and motor.
Installing a receiver can feel like trying to solve a puzzle in a very tight space. My best advice is to make all your wire connections before trying to tuck the receiver into the canopy. Get the wiring perfect first, then gently arrange everything to fit.
The wiring for a receiver is surprisingly straightforward:
- Input Side: The black (hot) and white (neutral) wires from your ceiling box connect to the receiver's "AC In" wires.
- Output Side: The receiver will have its own output wires (often black for the fan, blue for the light, and white for neutral) that connect directly to the matching wires on the fan itself.
This market is absolutely booming, thanks to global urbanization and the push for energy-efficient cooling. The ceiling fan market was valued at USD 12.97 billion and is projected to skyrocket to USD 19.61 billion by 2033. This growth is fueled by innovations like smart tech and quiet, energy-saving BLDC motors, making it more important than ever to know how to wire these modern units.
A Premium Example: The Haiku L Series Smart Fan
To see how it all comes together in a high-end product, look at a smart fan like the Haiku L Series by Big Ass Fans, which starts at $844. This isn't just a fan; it's a sophisticated piece of home tech with built-in Wi-Fi, SenseME technology for automatic adjustments, and seamless integration with Amazon Alexa and Google Assistant.
Wiring a Haiku involves installing its specific control module, so following the instructions to the letter is a must. Because it’s designed as a fully integrated system, the wall switch often just acts as a simple power cutoff. All the complex speed and light control is handled wirelessly by the fan’s internal electronics. Understanding this difference is vital—you're not wiring a dimmer, you're providing a power source for an intelligent device. This is the future of ceiling fans, where a little extra wiring knowledge unlocks a massive upgrade in home comfort and automation.
How to Troubleshoot Common Wiring Problems
So, you've followed all the steps, twisted the last wire nut into place, and flipped the breaker back on… only to be met with complete silence. Or maybe a weird, unsettling hum. Don't panic! Even seasoned pros hit these little roadblocks.
Think of troubleshooting not as a failure, but as the final puzzle. It’s where you really learn what’s going on inside that electrical box. Let's walk through the most common gremlins that pop up and how to get things working, starting with the simplest fixes first.
When Nothing Happens at All
You flip the switch, and… crickets. No light, no fan movement, nothing. This is the most frequent issue I run into, and thankfully, it's often the easiest to solve. Before you start questioning all your life choices, run through this quick checklist.
- Check the Obvious: Are the pull chains for both the fan and light in the "on" position? It sounds silly, but this trips people up more than you'd think!
- Confirm the Breaker: Head back to your electrical panel. Is the breaker fully flipped to "on"? Sometimes a breaker can look like it's on but is actually partially tripped. Flip it all the way off, then firmly back on.
- Tug Test Your Connections: Power off at the breaker again! Now, gently tug on each wire nut connection in the switch box and the ceiling canopy. A loose wire is the number one culprit for a dead fixture. It's easy for a connection to come undone as you tuck all the wires back into the box.
If those steps don't bring your fan to life, a loose neutral wire is a likely suspect. An incomplete neutral circuit means the electricity has nowhere to go, effectively cutting power.
The Dreaded Hum and No Spin
This one is especially frustrating. You can hear the fan’s motor trying to work, but the blades just won't move. That hum is a good sign—it tells you power is reaching the motor, but something is stopping it from engaging.
A buzzing or humming sound from a fan motor that isn't spinning often points to a bad start capacitor. But if the fan is brand new, it's almost always a wiring mix-up, not a faulty part.
With the power off, take a close look at your connections in the ceiling box. Did you connect the black "hot" wire from the switch to the fan's black motor wire? It’s incredibly easy to accidentally connect it to the fan's blue light wire instead. This sends power to the light kit but not enough juice to the motor windings, which results in that classic, frustrating hum.
For a high-performance fan like the sleek Fanimation Spitfire 60" fan (starting at $499), getting the wiring right is critical for its advanced motor to operate silently and efficiently. Miswiring a premium fan like this won't just hurt performance; it can potentially damage the motor over time.
When the Breaker Instantly Trips
You flip the breaker, and SNAP—you’re plunged back into darkness as it immediately trips. Don't be alarmed; this is your electrical system’s emergency brake, and you should be glad it’s working. It means you have a dead short, which happens when a hot wire touches a neutral or ground wire.
First thing's first: kill the power at the breaker before you touch anything.
The most common cause is a tiny, stray strand of a hot wire (black or red) poking out from under a wire nut and touching the side of the metal electrical box or a bare ground wire. Carefully pull the connections out and inspect everything. Also, check for any nicks or cuts in the wire insulation that could be making contact. This is exactly why using proper wire strippers is so important—a utility knife can easily score the insulation, creating an invisible short circuit that's just waiting to cause a problem.
Know When to Call a Professional Electrician
There's a certain pride that comes from a finished DIY project. You step back, look at the perfectly installed fixture, and think, "I did that." But when you’re dealing with electricity, that feeling of accomplishment is separated by a razor-thin line from a dangerous, costly mistake. Knowing how to wire a ceiling fan switch is a fantastic skill, but true wisdom lies in knowing when to put the tools down and call a pro.
This isn’t about giving up. It’s about respecting the very real power you’re working with and admitting that some situations are just non-negotiable. These are the times when hiring a licensed electrician isn't just a good idea—it's essential for keeping your home and family safe.
https://www.youtube.com/embed/NGqx7FpguRQ
Don't Ignore These Red Flags
When you take the cover off an electrical box, you should see neat copper wires sheathed in modern, flexible plastic. If you find anything else, it's a full stop.
- Old Aluminum Wiring: Common in homes built between the mid-1960s and early 1970s, aluminum wiring is notorious for becoming brittle and overheating where it connects to outlets and switches. Trying to connect it directly to new copper fixtures is a serious fire hazard. A professional knows how to use special connectors to make a safe transition.
- Cracked or Frayed Insulation: That plastic coating is the only thing preventing a short circuit. If the insulation on the wires looks brittle, cracked, or is flaking off in your hands, the wiring is compromised and needs an expert to assess and replace it.
- Missing Ground Wire: In older homes, you might open a box and find no ground wire (the bare copper or green one). While a fan might still run, you're missing a critical safety feature that protects against electrical shock. An electrician can figure out the safest path forward.
A buzzing switch, a faceplate that's warm to the touch, or a faint electrical burning smell are not small quirks. They are urgent warnings. These symptoms point to a serious problem like a loose connection or an overloaded circuit. Flip the breaker off immediately and get an expert on the phone.
When the Job Gets Too Complicated
Beyond the obvious hazards, some wiring jobs are just too complex to safely tackle without years of training. For instance, running a brand-new circuit from your breaker panel means working directly with your home's main electrical feed—a task that should always be left to a licensed pro.
The same goes for more advanced multi-switch setups. A 3-way or 4-way switch configuration can quickly turn into a confusing mess of "traveler" wires. One small mix-up doesn't just mean the fan won't work right; it can create a dangerous feedback loop in your wiring.
Protecting a Serious Investment
Let’s be real—not all fans are created equal. If you’re installing a high-end, industrial-grade fan like the Big Ass Fans i6 series, which starts at $1,445, you're dealing with a heavy, powerful piece of equipment.
The sheer weight alone often requires specialized mounting and bracing. Its power draw might even demand a dedicated circuit. In these cases, professional installation isn't just a recommendation; it's often a requirement to keep the warranty valid and ensure the fan operates safely and up to code.
This need for proper installation is a worldwide trend. The global ceiling fan market hit about USD 12.44 billion and is expected to climb to USD 15.23 billion by 2030. This boom is fueled by massive residential construction, especially in places like the Asia-Pacific region, where China alone commands over 26.7% of the market. This growth underscores a universal truth: whether it's a basic model or a premium smart fan, safe and correct wiring is crucial. You can read the full research about these global market trends to see just how widespread this is.
Ultimately, calling a pro isn't an admission of defeat. It's the smartest move you can make to protect your home, your investment, and your peace of mind.
A Few Common Questions About Fan Switches
Even the best-laid plans can hit a snag. When you're dealing with wiring, a few common questions always seem to pop up. Let's tackle some of the ones I hear the most so you can wrap up your project feeling like a pro.
Can I Just Use a Regular Light Dimmer for My Fan?
I get this one all the time, and the answer is an absolute, unequivocal no. It's a tempting shortcut, but it's a dangerous one.
A standard dimmer switch is designed to work with a simple light bulb filament. It controls brightness by essentially chopping up the electrical wave. While that's fine for a light, it's a nightmare for a fan motor. That choppy current makes the motor hum loudly, overheat, and will eventually burn out the windings.
You absolutely must use a switch specifically rated for fan speed control. These are built differently to safely regulate the voltage going to the motor.
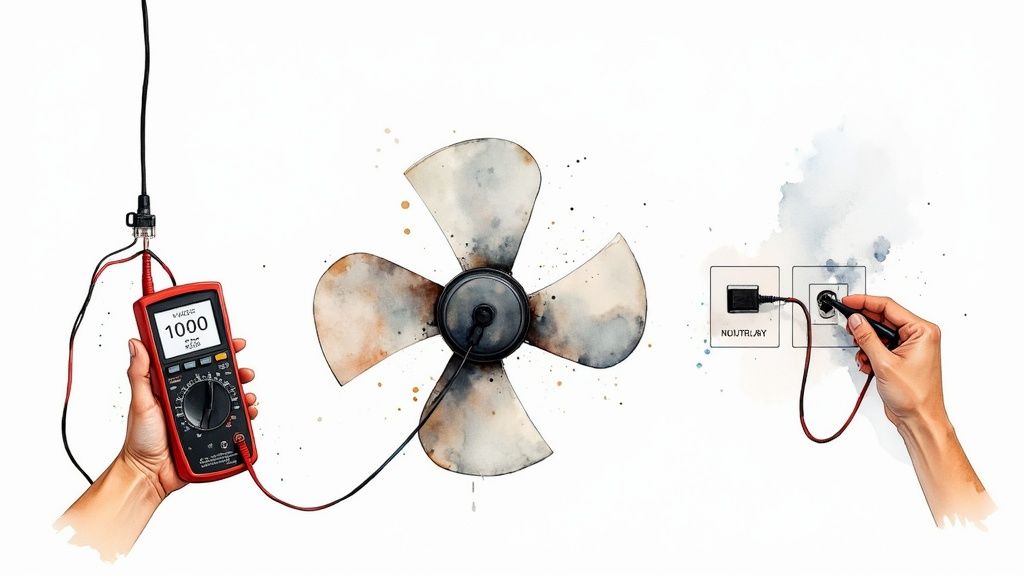
My Wires Aren’t the Colors in Your Diagram. Now What?
Don't panic. This is super common, especially in older homes where decades of updates might have left behind some... creative wiring. You might open the box and see all black wires or even old-school cloth-wrapped insulation.
When you run into non-standard colors, the golden rule is: do not guess.
The only safe way forward is to grab a multimeter and identify what each wire actually does. A multimeter lets you test for voltage, which will tell you for certain which wire is the "line" (bringing power in from the breaker) and which is the "load" (sending power out to the fan). If you're not comfortable using a multimeter, that's your cue to call in a licensed electrician.
I Installed Everything, But Now My Fan is Wobbling. What Gives?
A wobbly fan is almost never an electrical problem, but it’s a classic post-installation headache. Before you start questioning your wiring job, take a look at the fan's physical setup. Most new fans come with a balancing kit for this very reason.
Here’s what to check first:
- Loose Blades: Go back and double-check that every single screw holding the blades to the blade irons (the metal arms) is good and tight.
- Bent Blade Irons: Eyeball the blade irons to make sure none of them got bent during installation.
- Unbalanced Blades: This is the most likely culprit. Grab that balancing kit that came in the box. It’s a simple process of clipping a small weight to different blades until you find the one that's off-balance and then sticking on a permanent weight to fix it.
Also, make sure the fan is mounted to a proper, fan-rated electrical box. A standard light fixture box isn't strong enough to handle the weight and constant vibration. It can lead to a wobble at best, and a falling fan at worst.
The U.S. Fire Administration reports that faulty electrical systems are behind over 24,000 residential fires every year. A lot of these are preventable. Using the right parts, like a fan-rated box, is a small detail that makes a huge difference in safety.
Getting the installation right from the start means your fan will run smoothly, quietly, and safely for years.
Ready to find the perfect fan for your space? At Fan Connection, we carry a curated collection of premium ceiling fans that blend style with performance. For a real showstopper, check out the Kovacs Three Sixty 60" fan by Minka-Aire, a masterpiece of modern design and silent power, starting at just $499.95. Explore our full collection and find your perfect fan today at https://www.fanandlights.com.


