


How to Install Ceiling Fan With Light: The Complete DIY Guide
Installing a ceiling fan with an integrated light kit is a massively satisfying weekend project, but success hinges on what you do before you ever touch a wire. I've seen it a hundred times: a rushed start leads to endless trips to the hardware store, a whole lot of frustration, and a fan that wobbles like it's trying to dance.
Let’s get this party started. The whole job really has four parts: getting your space and tools ready, mounting the fan securely, wiring it all up, and then the final, glorious assembly. Getting that first part right will save you a world of headaches later on. Trust me.
Gathering Your Tools and Prepping for Success
Before you even think about lifting that surprisingly heavy motor, let's talk prep. This is the single most important phase, and skipping it is a classic rookie mistake that turns a fun project into a chore. Taking just an hour to get organized will make the rest of the installation feel like a breeze (pun intended).
This isn't just about dumping a toolbox on the floor; it's about creating a safe, efficient workspace. You'll be working overhead, so stability is your best friend. Seriously consider choosing a safe step ladder with a handrail — it makes a huge difference when you're trying to hold a fan motor with one hand and connect wires with the other.
Essential Tools and Materials for Your Installation
Here’s a complete checklist of everything you should have within arm's reach before you start. Having these items ready prevents that mid-project scramble where you're shouting down to a family member to find "the thingy."
| Tool/Material | Purpose | Pro Tip |
|---|---|---|
| Voltage Tester | Confirms power is 100% off at the ceiling box. This is non-negotiable for safety. | A non-contact "pen" tester is the easiest to use. Just touch it to the wires to check for voltage. It's a magic wand for not getting zapped. |
| Screwdrivers | Phillips and flathead for mounting bracket, canopy, and blade screws. | A multi-bit screwdriver saves space and time. A magnetic tip is a lifesaver for tiny screws that seem to have a mind of their own. |
| Wire Strippers/Cutters | Stripping wire insulation cleanly and trimming wires to length. | Don't use your teeth or a knife. Proper strippers prevent damage to the copper strands, ensuring a solid connection. |
| Pliers | Twisting wires together for a solid connection before adding a wire nut. | A pair of linesman's pliers will give you the best grip for a tight, secure twist. Your future self will thank you. |
| Stepladder | Provides a stable, safe platform for working overhead. | Ensure it's the right height for your ceiling and placed on a level surface. No wobbling allowed! |
| Safety Glasses | Protects your eyes from dust, debris, and falling screws. | You only get one pair of eyes. Wear them from start to finish. Looking cool is a bonus. |
| Drill/Driver | Speeds up the process of installing screws, especially into ceiling joists. | Keep it on a low-torque setting to avoid stripping screw heads. This isn't a race car pit stop. |
Trust me, having your tools laid out and ready to go transforms the entire experience from a chore into a professional-feeling project.

Confirming Your Ceiling Is Ready
Here's a critical safety check: not all electrical boxes in the ceiling can handle a fan. The one holding up that old light fixture probably isn't strong enough for the weight and constant vibration of a spinning fan.
You absolutely must have a fan-rated electrical box. These are usually made of metal and are bolted directly to a ceiling joist or a heavy-duty brace that spans between two joists.
Safety First: Go push on your existing box. If it's plastic or wiggles at all, it has to be replaced. A fan falling from the ceiling is a serious danger, and an underrated box is the number one cause.
Even with our easiest-to-install models like the Anywhere or Apex series, safety is paramount. The very first step is always killing the power at the breaker box. Faulty wiring is no joke, causing an estimated 51,000 home electrical fires yearly. Once the power is off, you can focus on ensuring your junction box can support at least 50 lbs.
Meet Your New Fan Parts
Last but not least, unbox everything and lay it all out like a surgeon preparing for an operation. Getting familiar with the components now will make the instruction manual feel less like a foreign language later.
You’ll typically see:
- Mounting Bracket: This is the metal anchor that attaches to your ceiling box and holds the whole fan up.
- Downrod & Canopy: The downrod sets the fan's height, and the canopy is the decorative bell-shaped piece that hides all the wiring and the bracket.
- Motor Housing: The main body of the fan. It's the heaviest part, so be ready.
- Blades & Blade Irons: The arms (irons) hold the blades and attach to the motor.
- Light Kit & Glass Shade: The final piece that provides illumination and wires directly into the fan itself.
With these prep steps handled, you're in a great position for a smooth, safe installation. For a deeper dive, you can always check out our complete guide on how to install a ceiling fan.
Mounting the Fan for a Secure and Stable Fit
Alright, with your tools laid out and the area prepped, we're ready for the hands-on part. This is where it all comes together, but we have to start with the most critical safety step of the entire job: making absolutely sure the power is off.
Head over to your circuit breaker panel. Find the breaker that sends power to the room you're in and flip it to the OFF position. Now, don't just take its word for it. Go back to the room with your voltage tester and carefully touch the probes to the black and white wires inside the ceiling box. You're looking for a reading of zero electrical current. This little check takes ten seconds and is your non-negotiable guarantee of safety.
Removing the Old Fixture and Checking the Box
Once you're 100% certain the power is dead, you can start taking down the old light fixture. This is usually pretty simple—just a couple of screws holding the fixture base to the electrical box. As you lower the old light, twist off the wire nuts to separate the house wiring from the fixture wiring.
With the old fixture gone, you'll have a clear view of the electrical box, and this is a major checkpoint. As we mentioned earlier, a standard plastic or metal box meant for a simple light fixture is not strong enough to hold a ceiling fan. You need a fan-rated box, which is made of metal and anchored directly to a ceiling joist or a heavy-duty brace.
Give the box a good, firm push. If it wiggles, feels loose, or is made of plastic, it absolutely has to be replaced. A spinning fan creates a lot of dynamic stress, and a flimsy box is a serious safety hazard just waiting to happen.
Installing a Fan-Rated Box and Bracket
If you found that your box isn't up to snuff, don't sweat it—swapping it out is a very doable part of the job. You'll need to remove the old box to install a new, fan-rated one. In a perfect world, a ceiling joist will be right above the hole. If so, you can drive heavy-duty screws from the new metal box straight into that solid wood joist for a rock-solid mount.
No joist right there? No problem. You'll use an expandable ceiling fan brace. This clever metal bar slides through the hole, expands to span the distance between two joists, and locks firmly into place. The fan-rated box then attaches to this brace, creating the unshakeable foundation your fan needs to run safely for years.
Pro Tip: When mounting into tough materials like a concrete ceiling, your choice of anchor is everything. Knowing the difference between a sleeve anchor vs wedge anchor can make or break the installation, ensuring a permanent and safe fit.
Once your fan-rated box is solidly in place, you can attach the new mounting bracket that came with your fan. Just guide the house wires through the opening in the center of the bracket and use the supplied screws to tighten it to the box. Make sure it's completely snug with no movement at all. You can learn more about the different options by checking out our guide on ceiling fan mounting bracket types.
Assembling the Fan on the Ground
Here’s a tip that will save your arms a world of hurt: assemble the main fan components on the floor before you even think about climbing the ladder. It's so much easier to work at chest height than it is to juggle a heavy motor and parts overhead.
Your Ground Assembly Checklist:
- Feed the Wires: Gently guide the motor's wires up through the center of the canopy (the decorative cone) and then through the downrod.
- Attach the Downrod: Connect the downrod to the motor collar, securing it with the clevis pin and then spreading the cotter pin to lock it in. Give it a good tug to be sure it's secure.
- Slide the Canopy: Let the canopy slide down the downrod until it rests on top of the motor housing.
I always use the styrofoam packaging from the fan box as a handy stand. It holds the motor steady while I work and keeps the finish from getting scratched up.
Hanging the Motor
With the fan mostly built, it's time to get it up there. Carefully carry the motor assembly up the ladder. Most modern fan brackets have a J-hook or a slot designed specifically to let you hang the fan temporarily. This frees up both of your hands for the wiring—a huge help. Simply lift the fan and seat the ball at the top of the downrod into the slot on the bracket.
This hands-free design is a true game-changer, especially when you're installing a high-end model like the gorgeous Maverick Super Max by Monte Carlo, which will set you back about $1,170. That fan has a powerful, heavy motor, and being able to hang it securely before connecting a single wire makes the job infinitely safer and less of a struggle. Now you're in the perfect position to tackle the wiring.
Making Sense of the Wires
Alright, let's tackle the part that can look a little intimidating: the wiring. Honestly, it's less like advanced electrical engineering and more like a simple color-matching game. Once you know what each wire does, connecting your new fan and light becomes a pretty logical, and dare I say, fun process.
Let's demystify what’s hiding in that ceiling box.
The core idea is the same no matter the fan: you’re connecting the fan’s wires to your home's power supply. In just about every house, you'll find three main wires coming down from the ceiling.
- Hot (Black): This is the live wire that brings the power from your breaker box. Think of it as the source of the party.
- Neutral (White): This wire completes the electrical loop, sending the current back to the source. It's the designated driver.
- Ground (Green or Bare Copper): Your safety net. If there's a fault, this wire gives the electricity a safe path to the ground, preventing shocks.
Your new fan will have a matching set of these wires, usually with an extra one thrown in for the light kit.
Taming the Wires for a Single Switch
This is the setup most people have—one switch on the wall that turns both the fan and the light on and off together. It’s simple and effective.
For this configuration, you want both the fan motor and the light to get power from that single black hot wire in your ceiling. The fan's motor wire is almost always black, while the light kit's power wire is typically blue. You’ll connect both of these to the black hot wire from your ceiling.
Making a solid connection here is key. Twist the bare copper ends of the three wires (the fan’s black, the light’s blue, and the ceiling’s black) together clockwise with pliers. Then, screw on a wire nut until it’s tight. Give it a little tug to make sure it's secure. No copper should be showing. After that, just connect the two white neutral wires and the two ground wires. Easy peasy.
Getting Independent Control With Two Switches
If your wall has two switches meant for the fan, you’re in luck. You can wire them to control the fan and light separately, which is the height of luxury. This setup requires an extra hot wire in your ceiling box, which is almost always red.
Here’s the new plan:
- Connect the fan's black motor wire to the ceiling's black hot wire.
- Connect the fan's blue light wire to the ceiling's red hot wire.
- Twist all the white neutral wires together.
- Finally, connect all the ground wires (green and/or bare copper) together.
This gives you total control. Run the fan without the light, or just use the light as a standalone fixture. For a deeper dive with more diagrams, check out our guide on how to wire a ceiling fan switch.
This infographic breaks down the initial physical steps that come right before you start wiring, showing the basic flow from start to finish.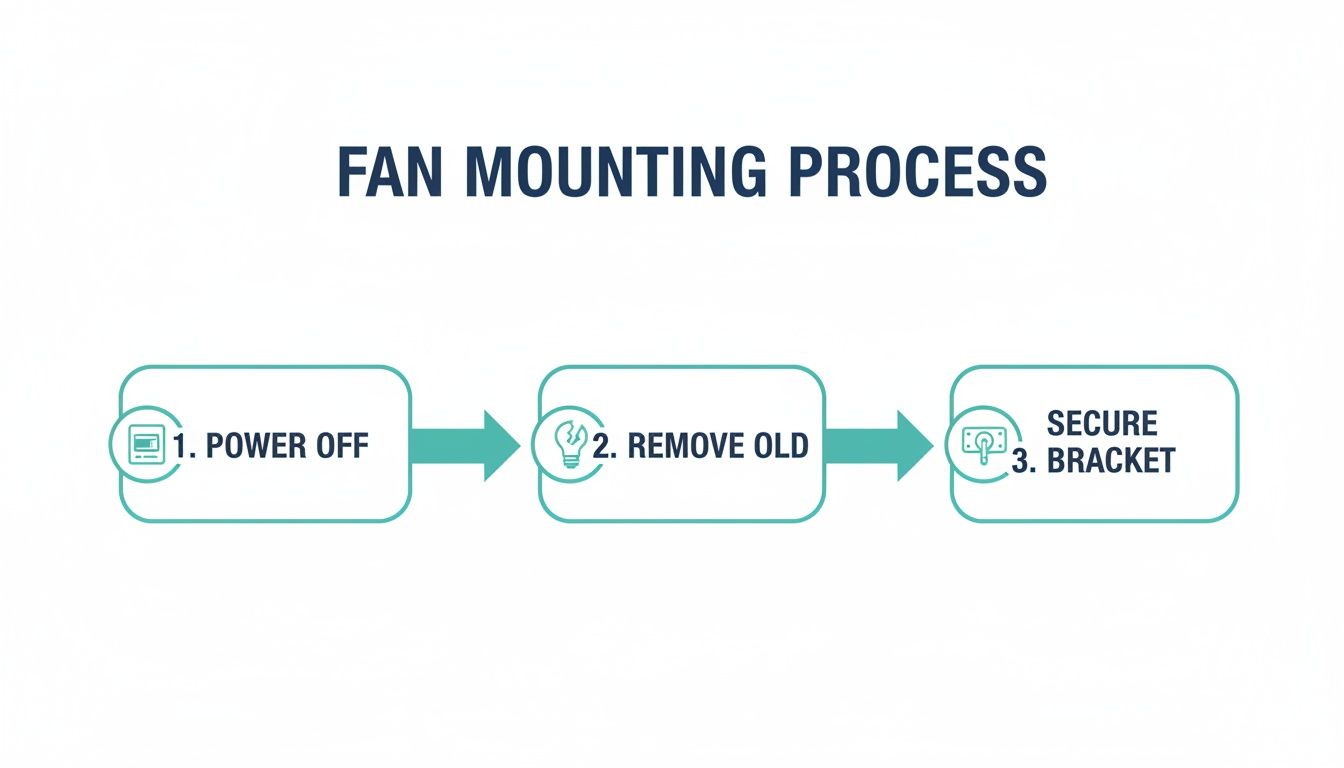
It’s a great visual reminder to always work safely and methodically, starting with killing the power before you touch a single wire.
What About a Remote Control?
Many modern fans, like the sleek Minka-Aire F844-DK Light Wave (priced around $320), come with a remote. Installing one just adds a small extra component into the mix: the receiver. It's a little black box that sits between your house wiring and the fan itself, acting as the fan's brain.
It’s pretty straightforward. You’ll connect the house wires to the "input" side of the receiver and the fan's wires to the "output" side, matching the colors as you go (black to black, white to white). Once it’s all wired up, the receiver unit slides right into the mounting bracket, just above the downrod ball. It'll be a snug fit, but it's designed to hide perfectly inside the canopy.
A secure mount is the foundation of any good fan installation. Your ceiling box and joist must be able to support a fan weighing up to 70 lbs. It's a startling fact, but an estimated 40% of DIY installation failures happen because of a weak or improperly secured mount. Once your fan is physically secure, proper wiring is the next critical step for safety and function. Getting this right has never been more important, especially as online fan purchases continue to grow at a 5.87% compound annual rate.
Final Assembly for a Wobble-Free Performance
You’re in the home stretch. The heavy lifting and tricky wiring are behind you, and this final phase is all about the details—the little things that turn a box of parts into a silent, perfectly balanced fixture. Getting this part right is what separates a frustratingly noisy fan from a whisper-quiet one you'll enjoy for years.
This is where your patience really pays off. Believe me, rushing the blade installation is the number one cause of a wobbly fan. The key is creating even, balanced tension from the very beginning.
Attaching the Fan Blades The Right Way
First, go ahead and attach each blade to its corresponding blade iron (that’s the metal arm) with the screws provided. You’ll want them snug, but don’t crank them down just yet. Now, you can attach the blade iron assemblies to the motor housing.
Here’s the secret sauce: tighten the screws in a crisscross or star pattern. If you have five blades, tighten the first screw, then skip a blade and tighten the third, then the fifth, then the second, and finally the fourth. It's the same technique mechanics use when changing a tire, and it works wonders by distributing pressure evenly to prevent warping. This ensures the blades are perfectly aligned from the get-go.
Once all the blades are on, circle back and give each screw a final quarter-turn to make sure it's secure. Just don't go overboard—too much torque can strip the screws or even crack the blade's finish.
Installing the Light Kit and Glass Shades
Next up is the light kit. Most modern fans make this part incredibly easy with a simple plug-and-play wire harness and a few mounting screws. Just attach the light fixture housing to the bottom of the fan motor, connect the wire plug, and secure it.
When it's time for the light bulbs and glass shades, pay close attention to the manufacturer's recommendations. There will be a sticker inside the light socket telling you the maximum wattage allowed. Exceeding this limit is a serious fire hazard because it can overheat the fixture and its wiring.
Pro Tip: If your fan has an integrated LED light, you're all set. If you're adding your own bulbs, I always recommend switching to LEDs. They run significantly cooler than old-school incandescent bulbs, use a fraction of the energy, and last for years, saving you countless trips up the ladder.
The Final Step: Banishing the Wobble
With the blades and light kit carefully attached, it’s time to head back to the breaker, restore power, and test your work. Flip the fan on its highest speed and just watch it for a moment. A tiny bit of movement is totally normal, but if you see a noticeable wobble, don't sweat it. It’s almost always an easy fix with the balancing kit that came in the box.
That little kit is your best friend for achieving a perfectly smooth spin. It just has a plastic clip and a few small, adhesive-backed weights.
Your Wobble-Fixing Checklist:
- Identify the Problem Blade: Attach the plastic clip to the trailing edge of one fan blade, about halfway out from the motor. Turn the fan on high and see what happens.
- Test Each Blade: Turn the fan off, move the clip to the next blade, and repeat. You'll quickly see the wobble get better or worse depending on where the clip is.
- Find the Sweet Spot: Once you find the blade where the clip made the most improvement, leave it there. Now, just slide that clip in and out along the edge of the blade to pinpoint the exact spot where the wobble nearly disappears.
- Place the Weight: Turn the fan off and take the clip off. Grab one of the adhesive weights, peel the backing, and stick it to the top center of the blade, right in line with where the clip was.
This simple process corrects any tiny weight differences between the blades. For a deeper dive into troubleshooting, our guide on how to balance a ceiling fan has even more detailed tips.
Now, step back and admire your silent, steady, and beautifully installed ceiling fan. Well done.
Upgrading Your Space With a Premium Fan
When you’re ready to move beyond the standard, off-the-shelf fan, you step into a world where design, technology, and pure comfort truly come together. This is where a ceiling fan stops being a simple utility and becomes a centerpiece—a genuine investment in your home’s style and performance.
We’re talking about architecturally stunning models like the Artemis XL5 by Minka-Aire, which starts around $750, or the sleek, powerful Aviation fan, also by Minka-Aire, priced from $550. These aren't just fans; they're conversation starters.
What Justifies the Investment?
So, what exactly are you getting for that price? It all comes down to superior engineering. Premium fans almost always feature DC motors, which are not only whisper-quiet but also up to 70% more energy-efficient than their traditional AC counterparts. Over time, that translates into real savings on your energy bills.
The materials are a huge step up, too. Forget the standard stamped metal and particle board. Here, you'll find handcrafted, aerodynamically designed blades made from solid wood or high-end composite materials. This precision engineering is what gives you that powerful, silent airflow without the wobble and noise you often get with cheaper fans.
When you install a premium fan, you're not just hanging a fixture; you're elevating the entire room. The superior balance and heavier, high-quality components require careful handling, but the payoff is a silent, perfectly stable performance that cheaper fans simply can't match.
Installation Tips for Premium Models
Learning how to install a ceiling fan with a light is one thing, but these high-end models come with a few of their own quirks.
- Heavier Components: The motors and blades on these fans are denser and carry more weight. You'll definitely want a helper on hand when it's time to lift the motor assembly onto the bracket. Don't try to be a hero here.
- Complex Receivers: Many premium fans come with advanced remote or smart home receivers. They can be a bit larger, so be patient when tucking the receiver and all that wiring into the canopy. It’s often a snug fit, so take a moment to organize the wires neatly before trying to slide the canopy into place.
- Advanced Features: If your fan is designed to integrate with a smart home system, read those specific instructions before you start wiring. You might have an extra step, like pairing the device, that needs to be done before you button everything up.
While medium-priced ceiling fans currently hold the largest market share at 53.9%, there’s a clear and growing trend toward these premium models. Getting the installation right is key to unlocking all their benefits. The good news is that DIY success rates are high—around 85% when following safety guidelines—which helps prevent common mistakes like improper grounding that account for 30% of related electrician calls. A properly installed premium fan can even reduce your air conditioning load by up to 30%, according to the DOE. You can explore more data about the growing ceiling fan market.
Common Installation Questions Answered
Even with the best instructions, you're bound to hit a snag or two during an installation. It happens. Think of this section as your project support line, tackling the most frequent head-scratchers I hear from fellow DIYers. Getting these right can be the difference between a frustrating afternoon and a project you're proud of.
What Should I Do If My New Ceiling Fan Wobbles?
A wobbly fan is easily the most common issue, but it's rarely a sign of a serious problem. Before you start thinking you have a lemon, relax. The cause is almost always a simple imbalance.
First, kill the power and double-check every single screw. Seriously, every one. Make sure the screws holding the blades to the blade irons are tight. Then check that the blade irons are secure against the motor. And don't forget the mounting bracket—it should be rock-solid against the ceiling box with zero play.
If it still wobbles, it’s time to break out that little balancing kit that came in the box.
- Clip the plastic clip onto the trailing edge of one of the blades.
- Turn the fan on high and watch the wobble. Is it better or worse?
- Repeat this on every single blade, making a mental note of which one seemed to calm the wobble the most.
- Once you've found the problem blade, take the clip off and stick one of the small adhesive weights from the kit in its place. This simple trick solves wobble issues 99% of the time.
Can I Install a Fan on a Sloped Ceiling?
Absolutely, but you might need a couple of extra parts to do it right. Most standard ceiling fans are built to handle a slight slope right out of the box—usually up to about 15 degrees. The ball-and-socket joint in the canopy is designed specifically for this.
For anything steeper, you'll need to grab two things:
- An Angled-Mount Adapter: This handy piece replaces the standard mounting bracket and gives the fan a perfectly level surface to hang from.
- A Longer Downrod: This is non-negotiable. It ensures the fan blades have enough clearance to spin freely without smacking into the high side of the ceiling.
Always check your fan's manual for its maximum slope angle and any specific accessories they recommend. A gorgeous fan on a vaulted ceiling is a real showstopper. For instance, pairing a statement piece like the Minka-Aire Artiste, which runs around $400, with a sloped ceiling adapter creates a truly elegant look.
How Do I Wire a Fan and Light to Two Switches?
This is a fantastic setup because you get independent control over the fan and light. To pull this off, your ceiling box needs to have two separate "hot" wires running to it from the wall switches. In most homes, this means you'll see one black and one red wire in the box, in addition to the white neutral and bare copper ground.
The wiring is all about assigning each hot wire to a specific job. You'll connect the fan's motor wire (typically black) to one of the hot wires from the wall (let's say, the black one). Then, connect the fan's light kit wire (usually blue) to the other hot wire (the red one).
All the white neutral wires get twisted together, and all the ground wires are tied together. Just like that, you've got the ability to run the fan on a warm night without having to turn on the light.
How Long Does This Project Usually Take?
Setting a realistic timeline is key to keeping your cool. For a straightforward replacement—meaning you're just swapping an old light fixture for a new fan—a person with basic DIY skills should set aside 2 to 4 hours. This gives you plenty of time to work safely and double-check your work without feeling rushed.
If your project involves replacing the ceiling box because the old one wasn't fan-rated, you'll want to add another 1 to 2 hours to your estimate. This step is critical for safety and it's not something you want to hurry through.
Remember, this isn't a race. The goal is a secure, quiet, and beautiful installation. If you're weighing the time commitment against calling in a pro, you can get a better idea of what to expect from our breakdown of ceiling fan labor costs.
At Fan Connection, we believe the right fan can completely transform a room. From the sleek and modern Apex to the grand Artemis XL5, our curated collections make it easy to find a fan that perfectly matches your style and performance needs. Explore our extensive range and find the ideal centerpiece for your home today. Visit us at https://www.fanandlights.com.


