


A DIY Guide to Remote Ceiling Fan Wiring Diagrams
So, you've decided to upgrade your living space with a remote-controlled ceiling fan. Excellent choice! But before you can kick back and enjoy that gentle breeze with the push of a button, you need to conquer the installation. Your secret weapon in this mission? The remote ceiling fan wiring diagram. Think of it as your essential roadmap for connecting the fan's remote receiver to your home's electrical wiring—the blueprint that shows you how to safely get power from the ceiling to the fan.
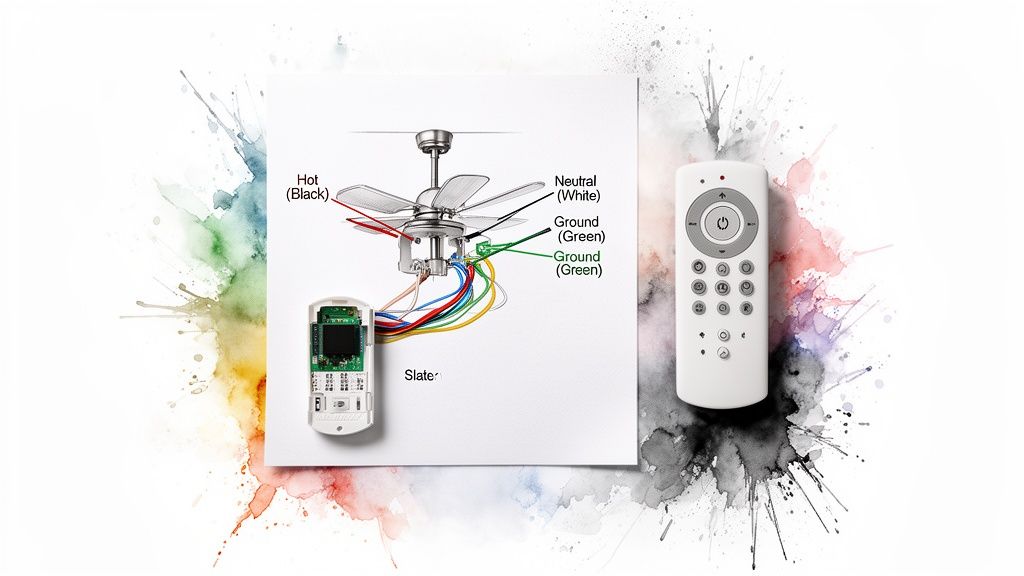
Typically, you'll see your ceiling box's black (hot), white (neutral), and green (ground) wires connecting to the receiver's input side. Then, a matching set of wires on the receiver's output side will connect to the fan's motor and light kit. Getting this right is non-negotiable for a safe and working fan, turning a potentially hair-pulling task into a high-five-worthy DIY victory.
Decoding Your Fan's Electrical Blueprint
Before you even think about twisting a wire nut, you need to understand the diagram in front of you. Think of it as a treasure map, and the treasure is a perfectly installed, remote-controlled ceiling fan. Trust me, ignoring this map almost always leads to a vortex of frustration and potential safety hazards. It’s the difference between bragging rights and a call to a very expensive electrician.
The heart of the whole operation is the relationship between the remote (your transmitter) and the receiver unit tucked neatly into the fan's canopy. The remote zaps a radio signal to the receiver, which is wired between your house's power and the fan itself. The receiver catches that signal and tells the fan what to do—change speed, dim the lights, or reverse the blades. It's basically a tiny, obedient robot living in your ceiling.
The Key Players: Your Wires
At its core, every single remote ceiling fan wiring diagram revolves around three fundamental wires. You absolutely have to get these right for both safety and performance. Let's meet the cast.
- The Hot Wire (Usually Black): This is the "live" wire, the rockstar of the circuit, carrying electrical current from your breaker box.
- The Neutral Wire (Usually White): This one is the humble roadie, completing the electrical circuit by sending the current back to the source.
- The Ground Wire (Green or Bare Copper): This is your most important safety feature, the bodyguard. If there’s a fault, it gives electricity a safe path to the ground, preventing a nasty shock.
A shockingly common mistake I've seen is mixing up the hot and neutral wires. Sure, the fan might still spin, but it creates a serious safety risk where the fixture can stay energized even when the switch is off. Always take a moment to identify your wires before you connect anything.
To help you get your bearings, here's a quick cheat sheet for the standard wire colors you'll encounter in North America.
Standard Wire Colors and Their Functions
| Wire Color | Common Function in Fan or Receiver | Corresponding House Wire |
|---|---|---|
| Black ("Live") | Power input (to receiver) or motor | Black |
| White ("Neutral") | Neutral connection | White |
| Green or Bare Copper | Ground connection | Green or Bare Copper |
| Blue ("Light Power") | Power to the light kit | N/A (Internal to fan) |
| Red/Other ("Fan Power") | Power to the fan motor | N/A (Internal to fan) |
This table should help you quickly match up what's coming out of your ceiling with what's on the fan's receiver.
A High-End Example: The Minka-Aire Artemis XL5
Let's look at a premium model to see these principles in action. The Minka-Aire Artemis XL5, a gorgeous fan that can run over $700, is known for its sleek design and powerful DC motor. But even with its advanced tech and fancy remote, the installation still boils down to the same core wiring concepts.
The included receiver has to be connected properly to your home's black, white, and ground wires. From there, the receiver's output wires feed the fan's motor and light. The diagram that comes with the Artemis XL5 clearly labels every connection, proving that even the most luxurious fans rely on a solid grasp of basic electrical principles.
Taking the time to build this foundational knowledge will do more than just get you through this one project; it builds confidence for future DIY tasks. To get a broader overview, you can learn more about how remote control ceiling fans work in our detailed guide. That first step of decoding the diagram ensures you start your installation on the right foot, sidestepping common pitfalls from the very beginning.
Gathering Your Tools and Safety Essentials

Before you even think about touching a wire, let’s get prepared. A smooth installation is all about having the right gear and a solid safety plan. Trying to wing it is just a recipe for a frustrating afternoon—or worse. This isn’t just about checking off a list; it’s about setting yourself up for success so your fan works perfectly and safely for years.
First things first, and this is the one step you absolutely cannot skip: kill the power. Head over to your breaker box and flip the switch for the room you're working in. If your breakers aren't labeled (a classic homeowner problem), you might have to shut off the main breaker to be certain.
Once you think the power is off, you have to verify it. Grab a non-contact voltage tester—it's your best friend for any electrical project. Just hold the tip near the wires at the ceiling. If it beeps or lights up, that circuit is still live. Don't move forward until that tester stays completely silent.
Your Essential Toolkit
Having everything you need within arm's reach saves you from a dozen trips up and down the ladder. Here's a quick rundown of the must-haves.
- A Sturdy Ladder: Make sure it's tall enough for your ceiling and planted firmly on a level floor. No wobbling allowed.
- Non-Contact Voltage Tester: I said it before, and I'll say it again—this is a non-negotiable safety tool.
- Screwdrivers: You'll want both a Phillips head and a flathead to handle the various bracket and canopy screws.
- Wire Strippers/Cutters: These are crucial for getting clean, properly sized wire ends. Don't try to use your teeth.
- Pliers: A good pair of needle-nose pliers is perfect for bending wires into a hook or tucking them neatly into the box.
- Wire Nuts: Your remote kit will come with some, but it's smart to have a few extras in the right sizes, just in case.
Pro Tips for a Smoother Installation
A couple of extra items can make a world of difference. A small magnetic parts tray is an absolute lifesaver for those tiny screws that seem determined to get lost. And please, wear safety glasses. You don't want dust and ceiling debris falling into your eyes while you're focused on wiring.
As you get your gear together, always keep safety at the front of your mind. If you're new to this, it's a good idea to review some general electrical safety guidance.
Take a picture of the existing wiring with your phone before you disconnect anything. This visual reference can be invaluable if you get confused about which wire goes where later on. It’s a simple trick that has saved me from major headaches more than once.
This level of care is especially important when you're installing a premium, design-forward fan. Imagine you've invested in a stunning model like the Fanimation 'The Spitfire', which can easily run over $500. The last thing you want is to risk damaging its sophisticated electronics because of a simple, preventable mistake.
For a complete walkthrough, our guide on how to install a ceiling fan has even more detailed steps.
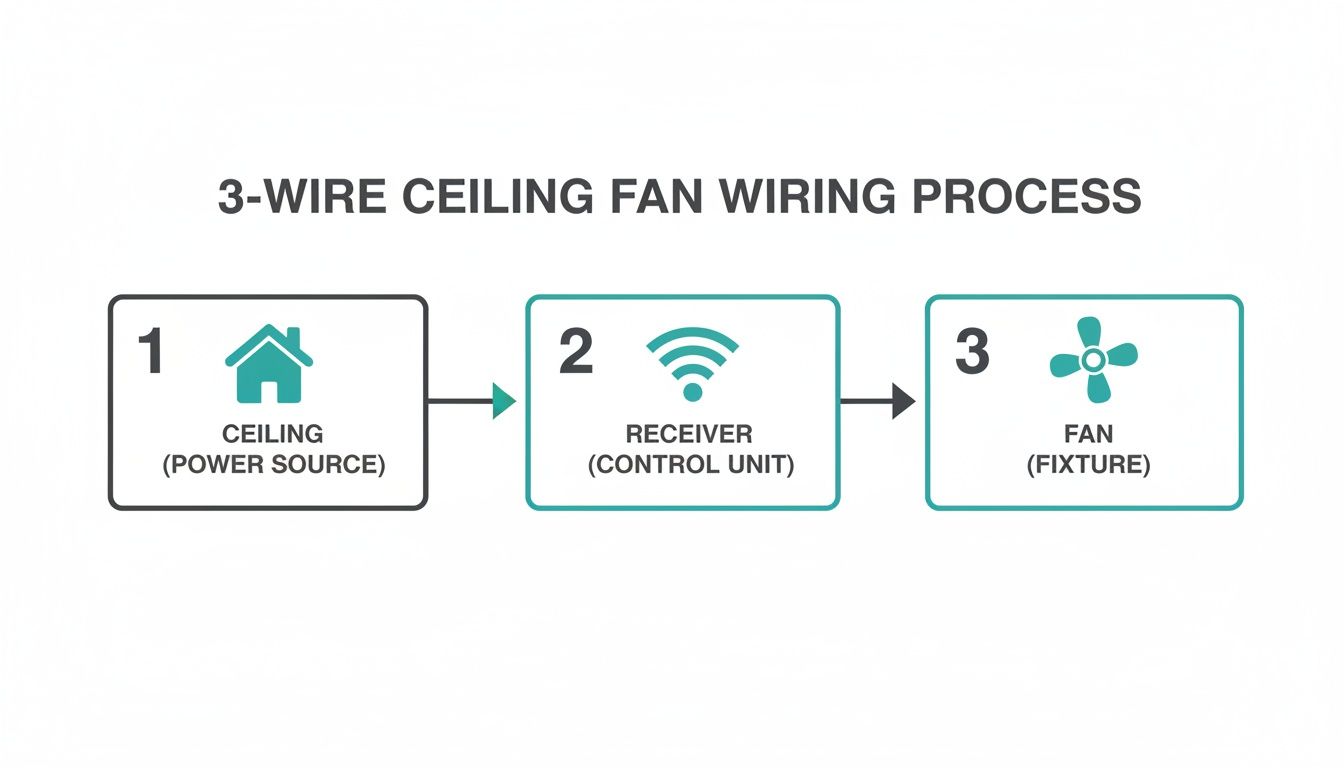
Wiring a Remote Receiver in a Standard 3-Wire Setup
Let's dive into the most common scenario you'll run into in a modern home: the standard 3-wire setup. This is the bread and butter of ceiling fan installations, consisting of a hot wire, a neutral, and a ground. Getting this right is a huge confidence booster for any DIYer.
We're going to break down exactly how to wire a remote receiver into this system. Think of the receiver as the "brain" between your house wiring and the fan itself. It takes the signals from your remote and translates them into actions, like changing the fan speed or dimming the lights. This is a crucial step in any successful remote ceiling fan wiring diagram.
To keep things practical, we'll use the stunning Fanimation 'The Spitfire' fan as our real-world example. This is an elegant, high-end model that often goes for $500 or more, but even its sophisticated remote system follows these same fundamental wiring principles.
Identifying and Connecting the House Wires
First things first, you need to know what you're working with. Before touching a single wire, kill the power at the breaker and double-check that it's off with a voltage tester. No skipping this part!
In a typical 3-wire setup from your ceiling box, you'll see:
- A Black Wire: This is your "hot" or "live" wire, carrying power from the wall switch.
- A White Wire: This is the "neutral" wire, which completes the circuit.
- A Green or Bare Copper Wire: This is the all-important ground wire, there for safety.
These wires are what power the whole operation, so they connect to the input side of your remote receiver. The receiver will have its own matching wires, usually also black and white. It’s a simple color-matching game: house black to receiver black, and house white to receiver white.
All the ground wires get twisted together—the one from the ceiling, the one from the fan's mounting bracket, and the one from the downrod—and secured with a single wire nut. This ensures the entire fixture is safely grounded. For other projects involving electrical work, a good DIY motorized installation guide can offer some great transferable safety tips.
Connecting the Receiver to the Fan
With the receiver getting power from the house, the next step is to send that power out to the fan and light kit. This means you'll be connecting the output wires from the receiver to the corresponding wires on the ceiling fan.
Thankfully, the industry has standardized wire colors, which makes our lives a lot easier. The output side of your receiver will typically have three wires:
- A Black Wire (labeled "Motor" or "Fan"): This connects to the fan's black motor wire.
- A Blue Wire (labeled "Light"): This connects to the fan's blue light kit wire.
- A White Wire (labeled "Neutral"): This connects to the fan's white neutral wire.
Pro Tip: Before you shove everything into the mounting bracket, connect all the wires and let the fan hang from its safety hook (if it has one). This lets you test the remote to make sure everything works before you finish the assembly. Trust me, this little step can save you a massive headache later.
With a premium fan like 'The Spitfire', all the connections are clearly marked, making the process pretty straightforward. Just use the wire nuts that came with the fan to make sure each connection is tight and secure.
Setting the DIP Switches for Perfect Communication
One of the most overlooked steps when following a remote ceiling fan wiring diagram is setting the DIP switches. These are the tiny little switches you'll find on both the remote and the receiver, and they're what allow the two to talk to each other on a unique frequency.
Why does this matter? If you have more than one remote-controlled fan in your house, setting them to different frequencies keeps one remote from accidentally turning on the fan in another room. It’s like giving each fan its own private radio station.
The process couldn't be simpler:
- Find the DIP switches on the receiver and inside the remote's battery compartment.
- You'll see a small bank of switches (usually 4 or 5) that can be flipped up or down.
- Just pick a random pattern (like up-down-up-down) and set the switches on both the receiver and the remote to the exact same pattern.
If the remote isn't working after you've put everything together, mismatched DIP switches are the number one culprit. Making sure they're identical is critical. This concept is also important when you're trying to figure out how to wire a ceiling fan switch and how it all plays together with a remote system.
Once your connections are solid and the DIP switches are matched, you can carefully tuck the receiver and wires into the fan's canopy. Screw the canopy to the mounting bracket, install the fan blades, and flip the power back on. Now you can stand back and test out your newly installed, remote-controlled fan.
Tackling 2-Wire and 4-Wire Installation Challenges
While a modern 3-wire setup is pretty standard, you'll often run into different wiring in older homes. Popping open the ceiling box and finding a 2-wire or 4-wire system can feel like you've been thrown a curveball, but it’s nothing to worry about. With the right know-how, you can still get that remote control working perfectly.
Honestly, these are the exact situations where a remote receiver becomes a lifesaver. It’s the perfect piece of tech to bridge the gap and bring modern convenience to an older home’s electrical setup.
Making a 2-Wire System Work for You
A 2-wire setup is classic in homes built before fans and lights had their own separate switches. When you look in the ceiling box, you'll likely find just one hot wire (black), one neutral wire (white), and the ground wire. This simple circuit was originally meant to power a basic light fixture, not a fan-and-light combo.
But this is where your remote receiver gets to be the hero. It essentially acts as a smart splitter, taking power from that single circuit and cleverly dividing it to control the fan motor and the light kit on their own.
- Connecting the Power: The black (hot) and white (neutral) wires coming from the house get connected to the receiver's matching black and white "input" wires.
- Sending Power to the Fan: The receiver's "output" wires—usually black for the fan motor and blue for the light—are then connected to the corresponding wires on your fan. The fan's white neutral wire also connects to the receiver's white output wire.
- What You Get: The wall switch now becomes a master on/off switch for the whole unit. From there, your remote takes over all the fun stuff like changing fan speeds and dimming the lights.
This diagram helps visualize how the power flows from that single source, through the receiver, and out to the fan's two separate functions.
You can see how the receiver is the central hub, turning the signals from your remote into actions for both the fan and the light.
Solving the 4-Wire Puzzle
On the flip side, you might find a 4-wire system. This usually happens in rooms where a fan and light were once controlled by two separate wall switches. In the ceiling, you’ll see two hot wires (typically black and red), a neutral, and a ground. This setup offers more control from the wall, but can be a bit confusing when you’re trying to install a single remote receiver.
The goal here is simple: consolidate. You want to power the entire fan unit through one circuit and let the remote do all the heavy lifting.
To do this, you’ll pick one of the hot wires from the ceiling—let’s say the black one—to power the receiver. The other hot wire (the red one in this case) is now redundant. You'll need to cap it off with a wire nut to make it safe.
Crucial Safety Tip: Always, always cap off any unused hot wires with a wire nut. An exposed live wire just sitting in your ceiling box is a serious fire hazard. Once it's capped, tuck it safely into the back of the box to keep it out of the way.
After that, the rest of the wiring is just like a standard 3-wire job. The hot wire you chose and the neutral wire from the ceiling connect to the receiver's input side. The receiver's output wires then hook up to the fan and light, giving you full control from the remote. You can dive deeper into this process in our guide on how to install a ceiling fan with lights.
Invest in a Fan That Can Keep Up
If your home has one of these non-standard wiring setups, it’s a smart move to invest in a quality fan with a versatile control system from the get-go. A great example is the Modern Forms 'Wynd' fan, which retails for over $400. Its advanced smart controls are specifically designed to be adaptable, making it a breeze to install in almost any electrical configuration.
The receiver and smart tech in a fan like this are built to handle these exact scenarios. It ensures you get smooth, reliable performance whether you're working with a simple 2-wire circuit or consolidating a 4-wire setup. Choosing a premium, adaptable fan can save you a ton of installation headaches down the road.
Troubleshooting Common Remote Control Wiring Problems
You’ve followed the wiring diagram, double-checked your work, and you flip the breaker back on only to find… nothing. It’s a frustrating moment we’ve all been through, but don't start tearing everything apart just yet.
Most remote control issues boil down to a handful of common, easily fixable problems. The best approach is a simple process of elimination, starting with the easiest fixes first. More often than not, the culprit is something minor you can sort out in a few minutes.
Fan or Light Is Completely Unresponsive
This is easily the most common headache. The fan is installed, it looks great, but the remote is a paperweight. Before you start questioning your wiring, run through this quick mental checklist.
-
Start with the Obvious: Are there fresh batteries in the remote? Did you remember to pull out that little plastic tab from the battery compartment? It sounds almost too simple, but this solves the problem more than 50% of the time.
-
Confirm Power is Flowing: Is the wall switch in the "on" position? Did the circuit breaker actually get flipped all the way back on? Grab your non-contact voltage tester and hold it up to the ceiling box one more time to be sure power is making it to the fan.
-
Check Your DIP Switches: If your remote and receiver have a set of DIP switches, are they set to the exact same pattern? Even one tiny switch in the wrong position will prevent them from communicating.
If these simple checks don’t do the trick, it’s time to look at your connections again. A loose wire nut is the hidden villain in many installations. Just kill the power at the breaker and give each wire nut a gentle tug to make sure every connection is solid.
The Fan is Stuck on a Single Speed
Here’s another puzzling one: the remote turns the light on and off just fine, but the fan is stuck on one speed (usually high), and the speed buttons do nothing.
This almost always points back to a simple oversight during installation. Remember when you were supposed to set the fan's pull chain to its highest speed setting before tucking it away inside the canopy? If it was left on a medium or low setting, the receiver can't send more power than the pull chain allows. The fix is easy: cut the power, lower the canopy, and set that pull chain to the highest speed.
Annoying Flickering Lights
Flickering lights are more than just an annoyance; they can point to a wiring issue that needs attention. The shift toward remote-controlled fans, which now account for approximately 40-50% of new installations, has made proper wiring more critical than ever, especially with integrated light kits.
Here’s what to check for:
- Incompatible Light Bulbs: If your remote has a dimming function, you absolutely must use dimmable bulbs. Slapping a non-dimmable bulb in there is a surefire recipe for flickering, buzzing, or both.
- Loose Connections: A flickering light is the classic symptom of a loose neutral (white) wire or light (blue) wire. Turn off the power and double-check those specific wire nut connections to make sure they're tight.
A quick pro tip: When you're putting everything back together, make sure the receiver's antenna wire isn't all bunched up or pressed against the metal mounting bracket. Let it hang freely, away from the other wires. This tiny adjustment can make a huge difference in your remote's signal strength and responsiveness.
If you’ve tried all these steps and the fan still isn’t cooperating, the remote or receiver itself might be faulty. It happens. If you think it's time for a replacement, check out our guide on finding the right replacement fan remote control for your specific model.
A Few Common Questions About Fan Remote Wiring
Even with the best instructions, every DIY project has its own unique quirks. This is where we tackle those common head-scratchers that pop up right when you think you're almost done. Let's get these last few details ironed out so you can wrap up your project with confidence.
Can I Really Add a Remote to Any Old Ceiling Fan?
Pretty much! Almost any standard pull-chain ceiling fan can be upgraded with a universal remote control kit. The biggest gotcha isn't the wiring—it's the physical space. The remote's receiver has to fit comfortably inside the fan's canopy up at the ceiling, and you don't want to be cramming wires in there.
Before you even buy a kit, it’s a smart move to pop the fan's canopy off and just measure the space you're working with. Be warned: some styles, especially "hugger" or low-profile fans, are notorious for having very little extra room and might not be compatible.
The key takeaway here is that compatibility is physical as much as it is electrical. For a guaranteed perfect fit and flawless performance, sometimes the best route is investing in a high-end fan that comes with its own matched remote system. Models like the Fanimation 'The Spitfire', which can run over $500, are designed with integrated systems that take out all the guesswork.
My Wall Box Only Has Two Wires. How Do I Connect the Remote?
Ah, the classic 2-wire setup. This is super common, especially in older homes where a single switch was originally meant for a simple light fixture. You've got your hot wire (power) and your neutral wire. The good news is, a remote receiver is exactly what you need to make this work for a modern fan.
You'll simply connect the house's hot and neutral wires to the receiver's input side. From there, the receiver's output wires (usually black for the fan motor and blue for the light) connect to the matching wires on the fan itself. The remote now becomes your new "switch" for both the fan and light, while the wall switch just becomes a master on/off for the whole unit.
I Hooked Everything Up, but My Remote Isn't Working. What Gives?
This is easily the number one frustration, but don't panic—the fix is usually something simple. Before you start taking things apart, run through this quick checklist:
- Check the Batteries: Seriously. Did you pull out that little plastic tab? Are the batteries fresh and put in the right way? This solves the problem more than half the time.
- Confirm the DIP Switches: If your remote has them, those tiny switches on both the remote and the receiver have to be set in the exact same pattern. If even one is off, they won't talk to each other.
- Verify Wire Connections: A loose wire nut is a classic culprit. Give each connection a gentle tug to make sure it’s snug and secure.
- Mind the Antenna: That thin antenna wire on the receiver needs a little space. Make sure it isn't crammed up against the metal bracket or a bundle of other wires inside the canopy, as that can easily block the signal.
Can I Still Use My Wall Switches with the New Remote?
You bet, but their job changes a bit. The main wall switch that provides power to the fan will now act as a master power switch. For the remote to do its thing, that wall switch has to stay in the "ON" position.
If you had two separate wall switches—one for the fan and one for the light—you'll typically simplify things. You'll wire the remote receiver to just one of those switches. Then, you'll safely cap off the wires from the second, now-unneeded switch. This cleans things up and puts all the control right in the palm of your hand.
At Fan Connection, we believe the right fan does more than just move air; it completes a room. Explore our curated collections of premium ceiling fans designed for style, performance, and easy installation. Find your perfect match today at https://www.fanandlights.com.


